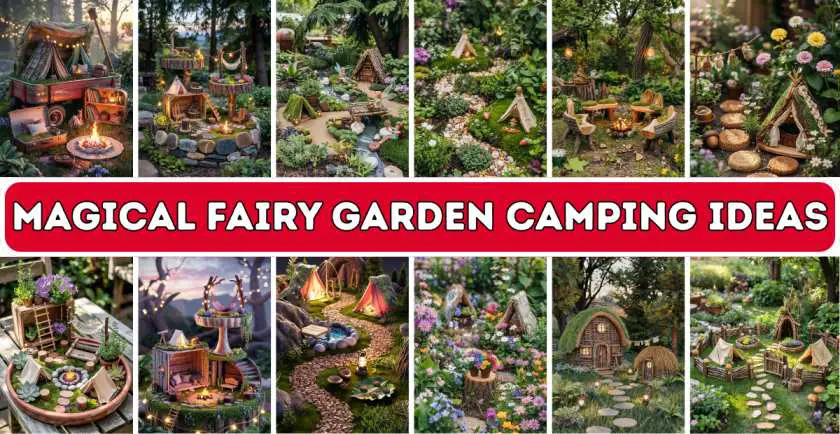
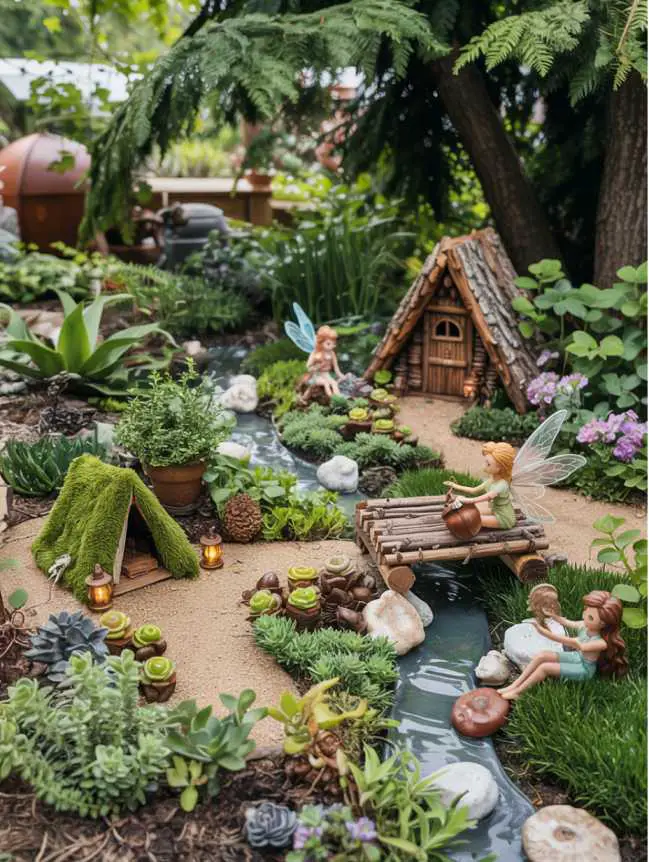
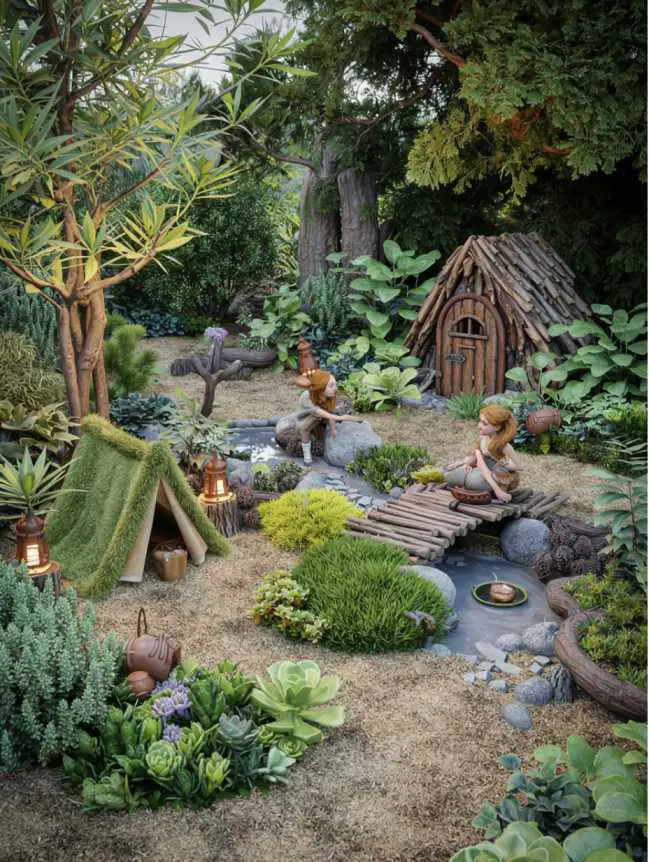
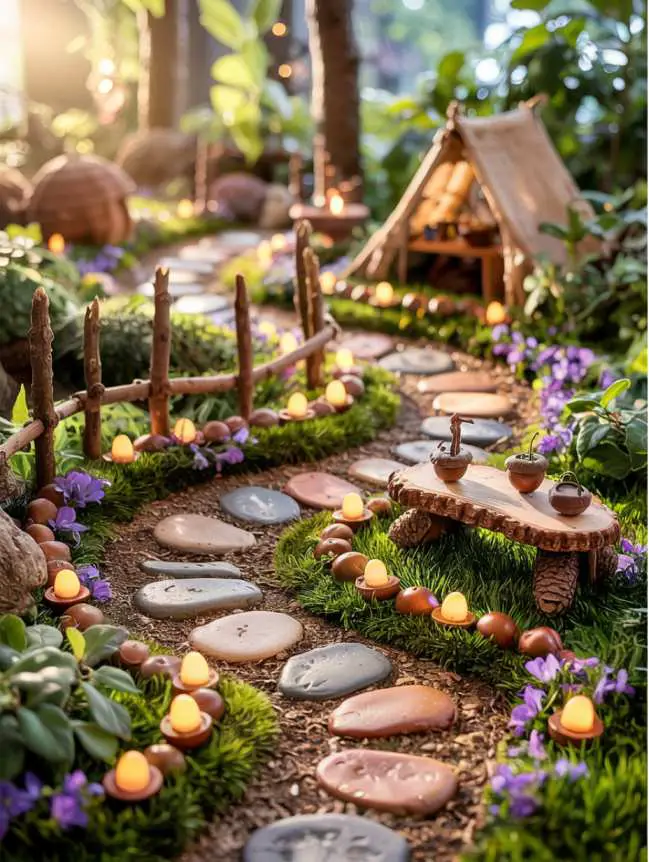
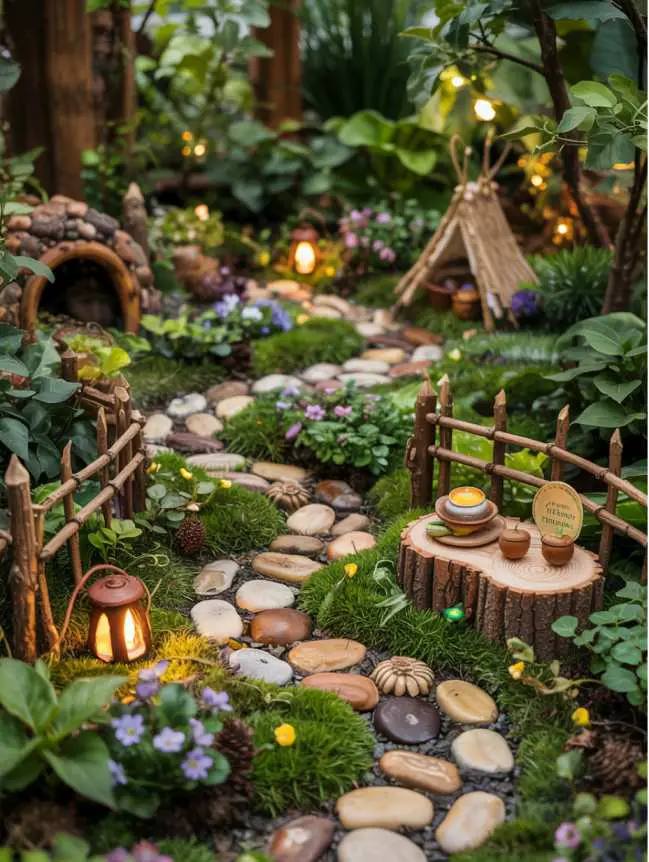
Imagine a world where tiny adventures come to life right in your garden—where miniature tents nestle beneath thimble-sized leaves and acorn-cap lanterns glow softly in the twilight. Creating these magical miniature worlds isn’t just a hobby; it’s an invitation to reconnect with wonder and imagination, no matter your age.
Looking for Fairy Garden Camping Ideas that will transform your outdoor space into an enchanted wilderness retreat? You’ve come to the right place! Whether you’re crafting with children or designing a sophisticated miniature landscape for your patio, these whimsical camping scenes offer endless possibilities for creativity while bringing a touch of magic to any garden space.
The best part about fairy gardening is how it combines creativity with a connection to nature. As you place tiny log benches around a pebble fire pit or hang diminutive lanterns from twigs, you’ll find yourself slowing down and noticing the small beauties that surround us every day—the perfect antidote to our fast-paced world. Let’s explore how to create your own miniature outdoor paradise where fairy adventures await.
By clicking on any of the links in this post and then buying something, I may get a small fee at no extra cost to you. This helps support the website and allows me to continue bringing you valuable content. Thank you for your support! For full details, please visit my affiliate disclosure page.
Magical Ideas for Miniature Outdoor Escapes
Imagine a world where tiny adventures come to life right in your garden—where miniature tents nestle beneath thimble-sized leaves and acorn-cap lanterns glow softly in the twilight. Creating these magical miniature worlds isn’t just a hobby; it’s an invitation to reconnect with wonder and imagination, no matter your age.
Looking for Fairy Garden Camping Ideas that will transform your outdoor space into an enchanted wilderness retreat? You’ve come to the right place! Whether you’re crafting with children or designing a sophisticated miniature landscape for your patio, these whimsical camping scenes offer endless possibilities for creativity while bringing a touch of magic to any garden space.
The best part about fairy gardening is how it combines creativity with a connection to nature. As you place tiny log benches around a pebble fire pit or hang diminutive lanterns from twigs, you’ll find yourself slowing down and noticing the small beauties that surround us every day—the perfect antidote to our fast-paced world. Let’s explore how to create your own miniature outdoor paradise where fairy adventures await.
Choosing Your Fairy Campsite Location
Every magical fairy camping adventure begins with finding the perfect location—a special place where your miniature world can flourish and capture the imagination. The right setting creates the foundation for your entire fairy garden, so it’s worth taking time to consider all your options.
1. Natural Containers with Character
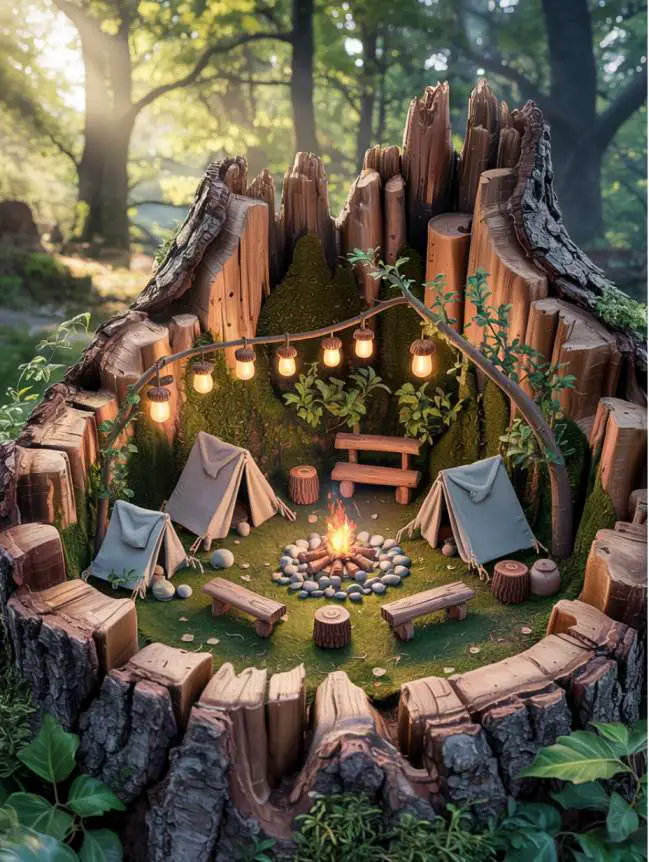
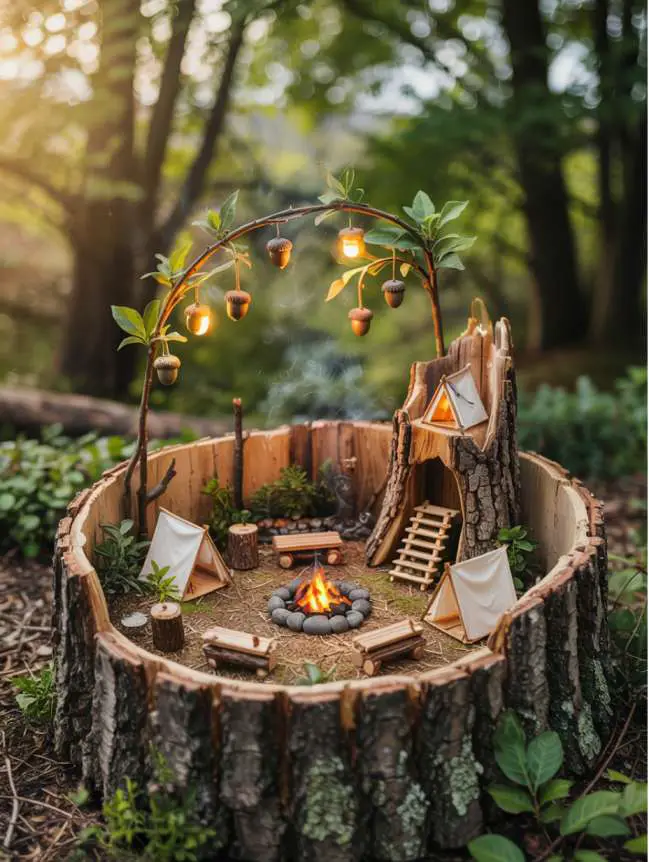
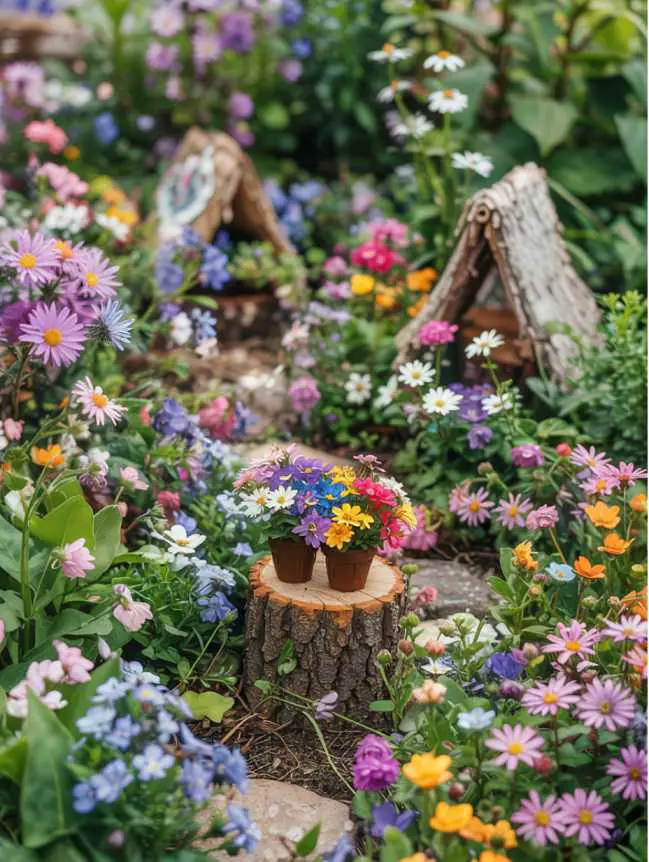
Hollowed tree stumps provide some of the most enchanting foundations for fairy camping gardens. Their weathered surfaces, natural curves, and organic appearance instantly create a woodland atmosphere that’s perfect for tiny adventures. If you’re lucky enough to have an old stump in your yard, consider transforming it into fairy camping grounds. The natural rings and grain patterns in the wood suggest pathways and terrain changes, while the hollow center creates a natural amphitheater effect that draws the eye inward to your miniature scene.
For those without access to tree stumps, look for naturally hollow logs or pieces of driftwood with interesting cavities. These can be positioned horizontally or vertically depending on your vision, with each unique shape suggesting different camping layouts. The natural decomposition process often creates perfect nooks for tents, gathering spaces, and fairy amenities.
2. Portable Garden Containers
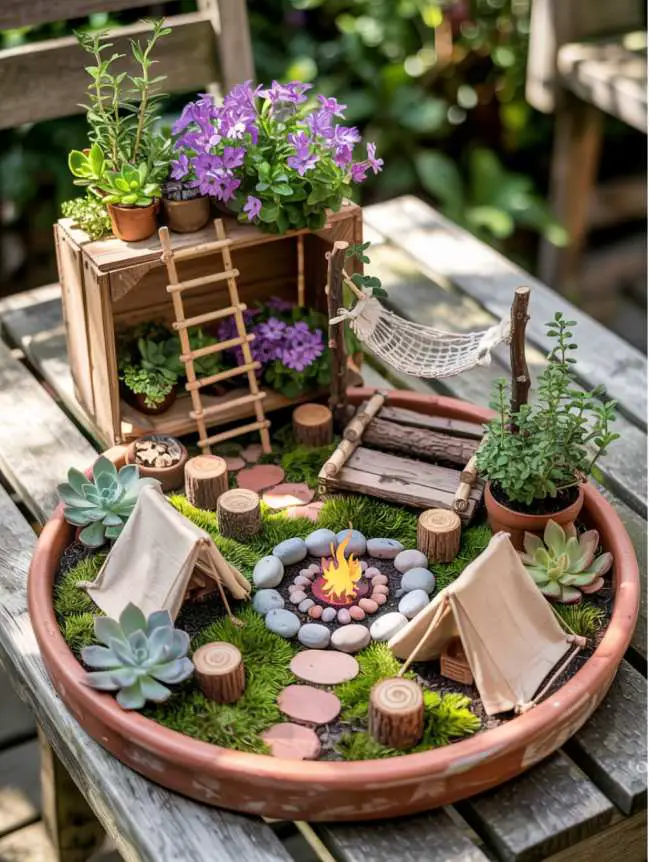
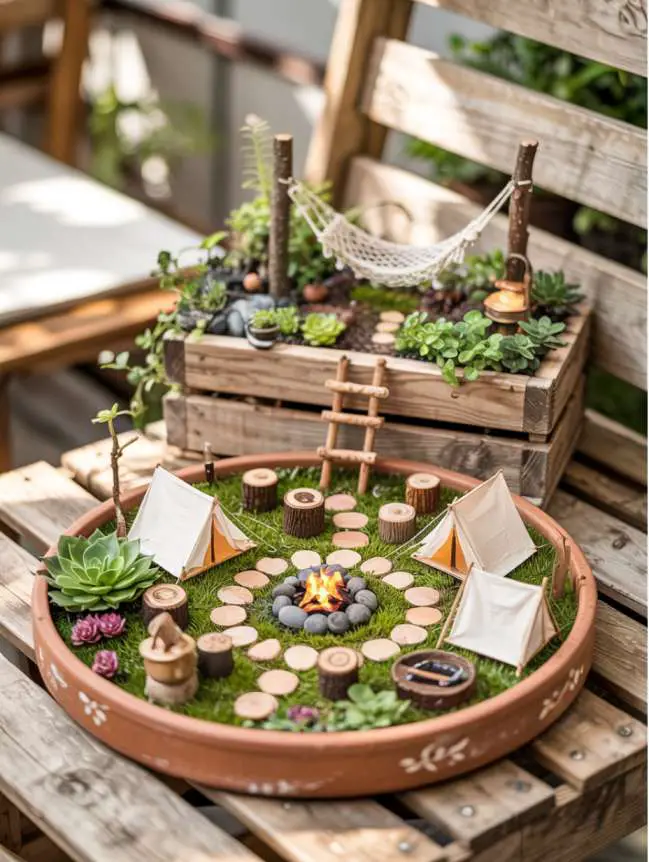
Shallow terracotta containers offer wonderful versatility for fairy campsites. Their earthy color and porous material complement natural elements while providing excellent drainage for plants. Choose wider, shallower containers over deep pots to give yourself more surface area for creating your miniature landscape. The portability of these containers allows you to move your fairy camping garden to follow optimal sunlight throughout the seasons or bring it indoors during harsh weather.
Wooden crates or boxes lined with landscape fabric make excellent rectangular camping grounds with defined edges—perfect for creating the impression of a designated campsite area. The straight sides also provide opportunities to create terraced landscapes or add climbing elements like tiny ladders and rope bridges.
3. Repurposed Treasures as Fairy Habitats
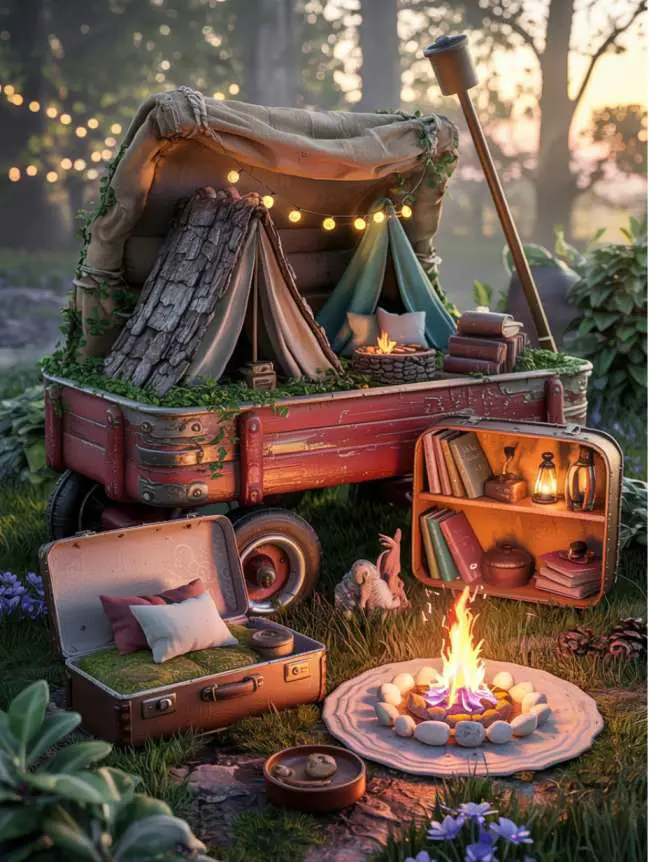

One of the most charming aspects of fairy gardening is repurposing unique containers that tell their own stories. An old red wagon with a weathered patina makes a nostalgic and whimsical home for camping fairies, with the added benefit of mobility. Vintage suitcases with their lids propped open suggest fairies on a grand camping expedition, while their compartments and interior details can be incorporated into the landscape design.
Rustic wooden toolboxes, antique breadboxes, or even old dresser drawers can be transformed into fairy camping grounds with character. Look for items with interesting hardware, compartments, or details that can be incorporated into your fairy narrative. That old brass handle might become a fairy zip line, while decorative corner brackets could serve as supports for miniature camping structures.
4. Multi-Level Landscapes for Drama
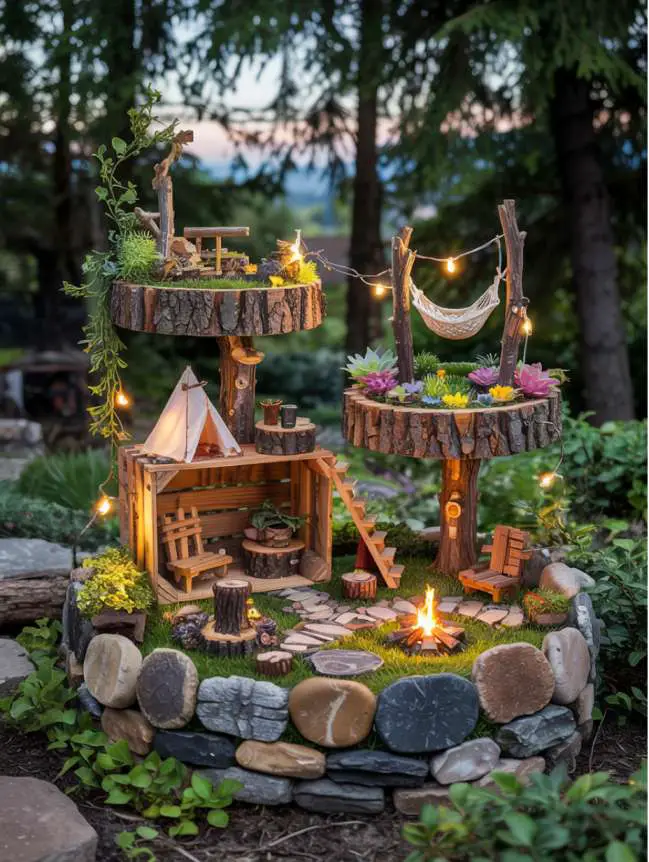
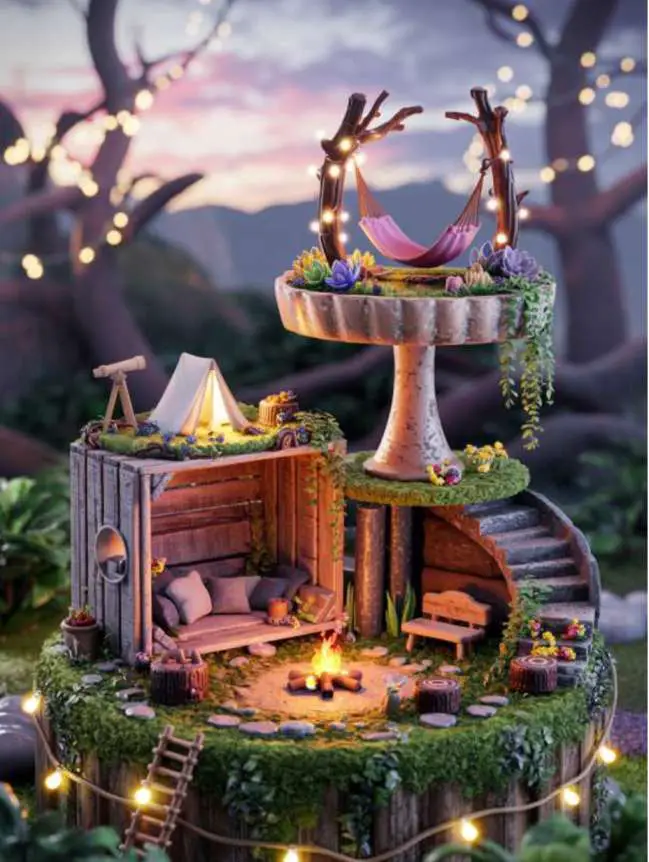
Creating elevation changes in your fairy camping garden adds visual interest and expands the play possibilities. Stack weathered stones of varying sizes to create miniature cliffs, plateaus, and hidden grottos for fairy exploration. These multi-level designs can include cascading plants that suggest waterfalls or dense forests.
Tiered plant stands or cake stands repurposed as fairy garden foundations instantly create different camping “zones” connected by tiny staircases or rope bridges. The upper levels might feature lookout points or observatory tents, while lower levels could house communal camping activities.
For a truly spectacular display, consider creating a fairy garden village using multiple containers of different heights grouped together. Each container might represent a different camping area—one for tents, another for fishing and water activities, and perhaps a third for fairy feasting and celebrations—all visually connected through your creative design.
5. Climate and Plant Considerations
When selecting your fairy campsite location, consider practical factors like sunlight, water drainage, and accessibility. Fairy gardens placed in full sun will require drought-tolerant plants, while those in shadier spots can incorporate ferns and mosses for a lush woodland feel. Position your fairy garden where you can easily tend to it and where it will be visible for enjoyment—perhaps near a patio seating area or visible from a kitchen window.
If you live in an area with extreme weather conditions, plan accordingly with shelter options. A fairy garden under the protective canopy of a large tree might benefit from natural protection, while those in open areas might need seasonal relocation or protective covers.
The perfect fairy camping location ultimately combines practical considerations with magical possibilities, creating a space where your imagination can roam as freely as the tiny inhabitants you’ll create to populate your miniature world. Once you’ve selected your ideal foundation, you’re ready to begin designing the camping landscape itself, adding the essential elements that will bring your fairy adventure to life.
Essential Elements for Your Fairy Camping Garden
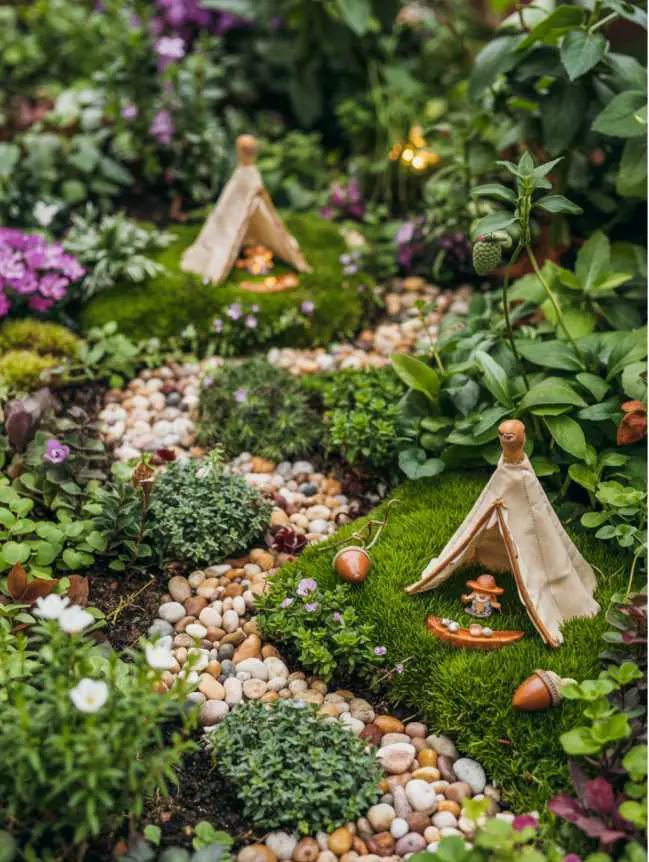
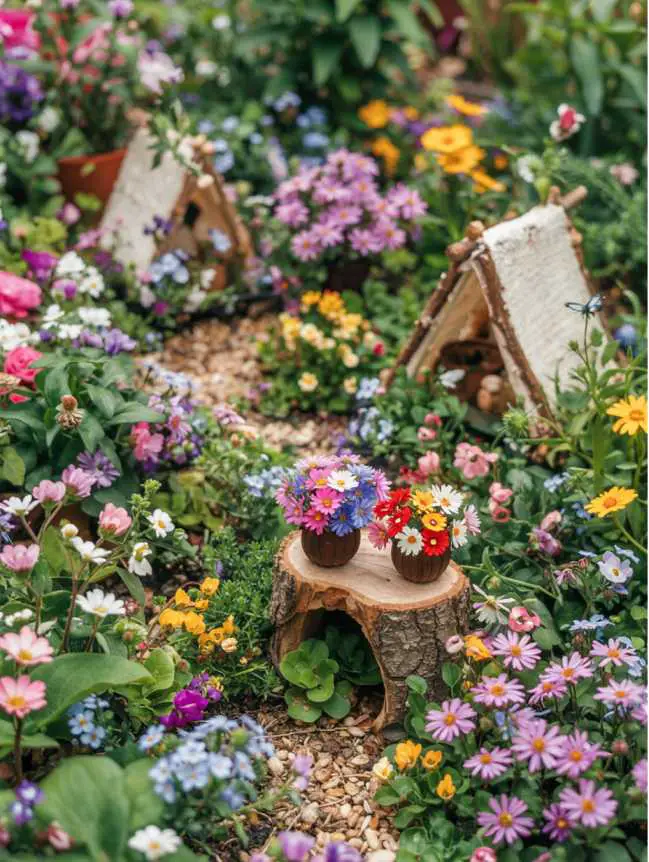
1. Miniature Tents and Shelters
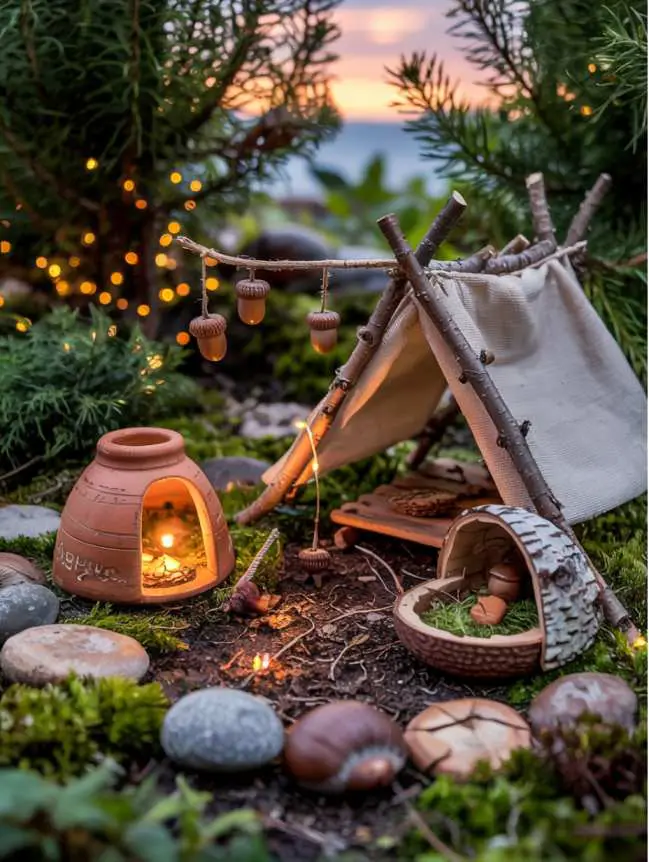
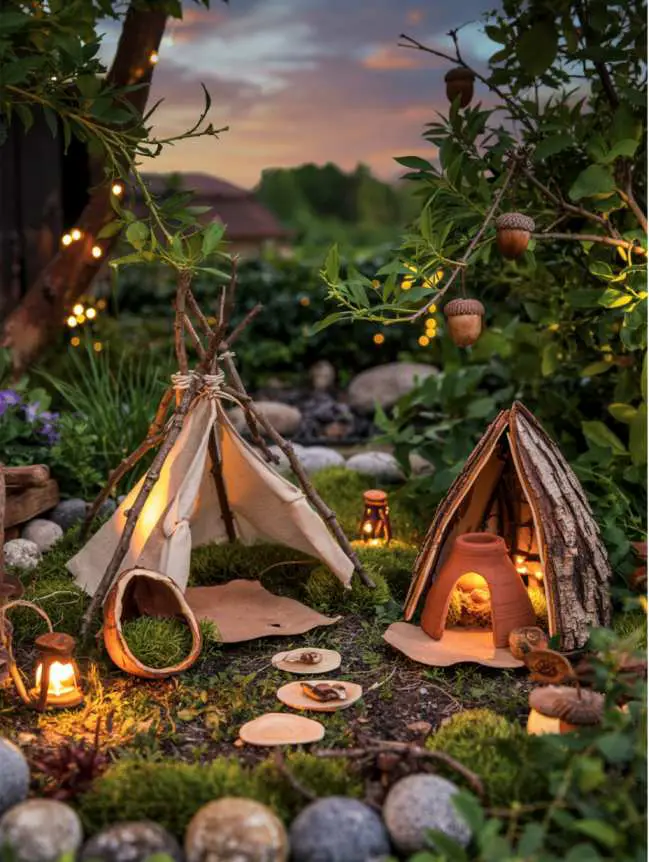
The centerpiece of any camping fairy garden is the accommodation! Create tents using:
- Small pieces of canvas or felt stretched over twigs
- Hollowed-out walnut shells for sleeping pods
- Upturned terracotta pots with doorways cut into them
- Birch bark rolled into teepee structures
- Moss-covered stones arranged as fairy-sized yurts
For a truly magical touch, add tiny battery-operated LED lights inside the tents to create a gentle glow in the evening.
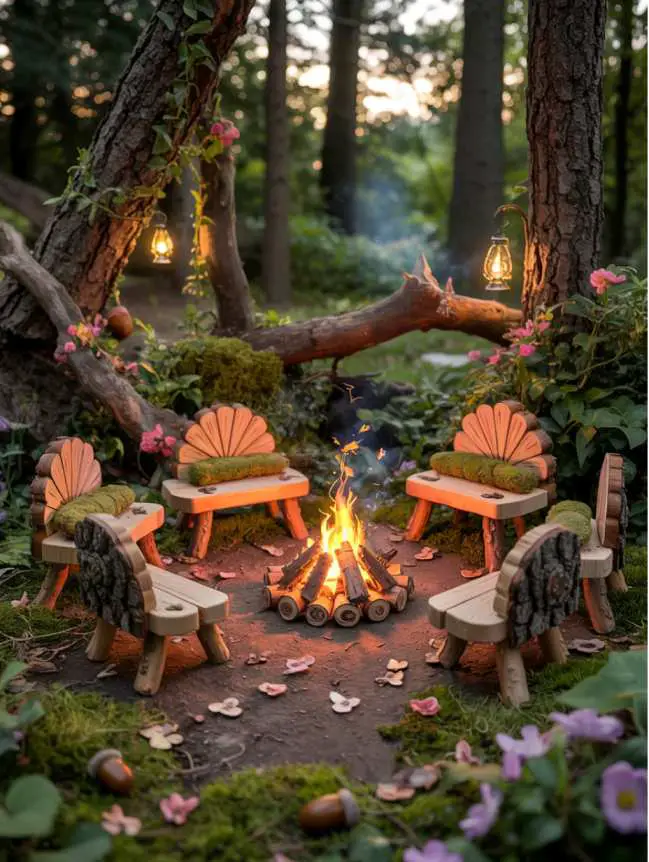
2. Campfire and Gathering Spaces
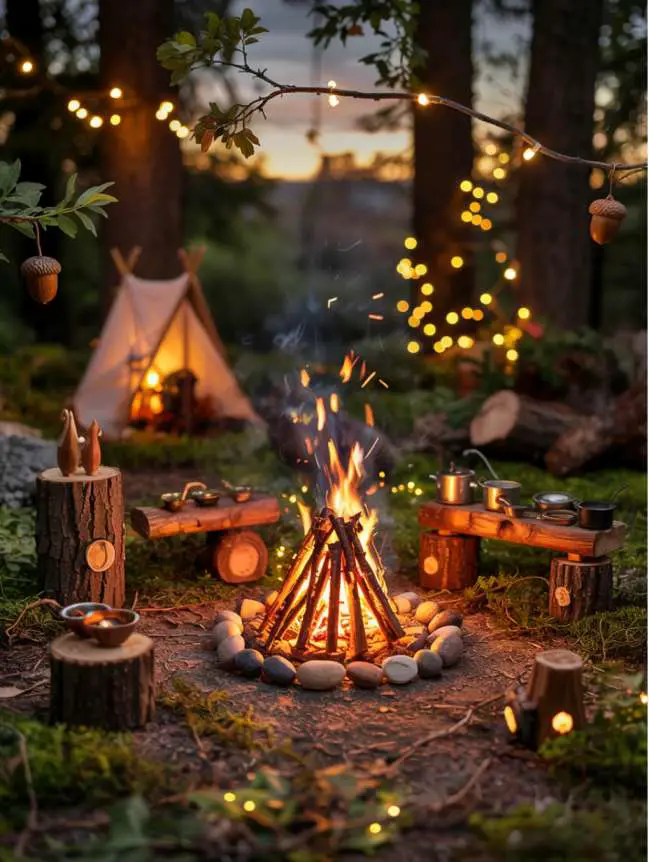
No camping experience is complete without a campfire! Create a miniature version using:
- Small pebbles arranged in a circle
- Tiny twigs stacked in the center
- Red and orange glass beads or translucent polymer clay for “flames”
- Miniature log sections as seating around the fire
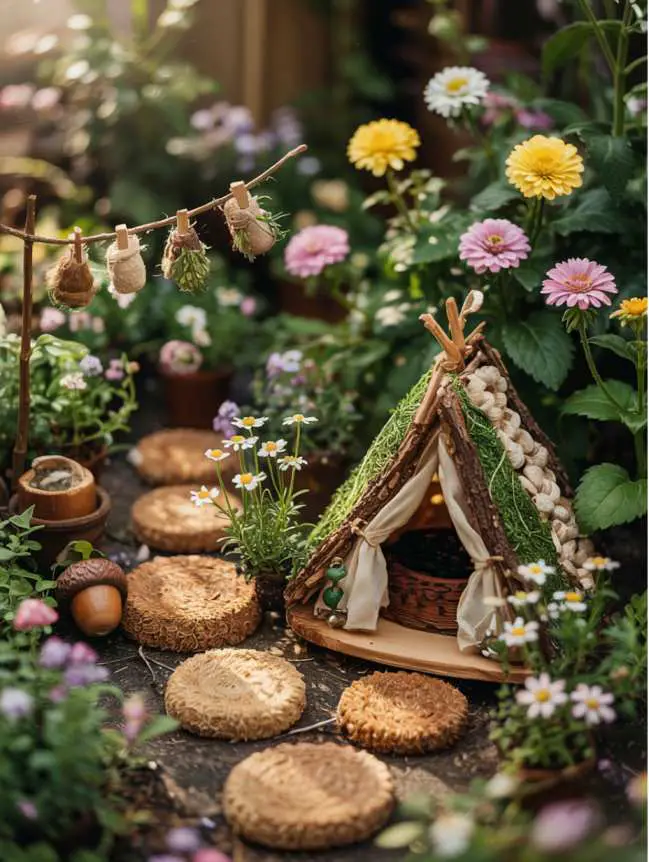
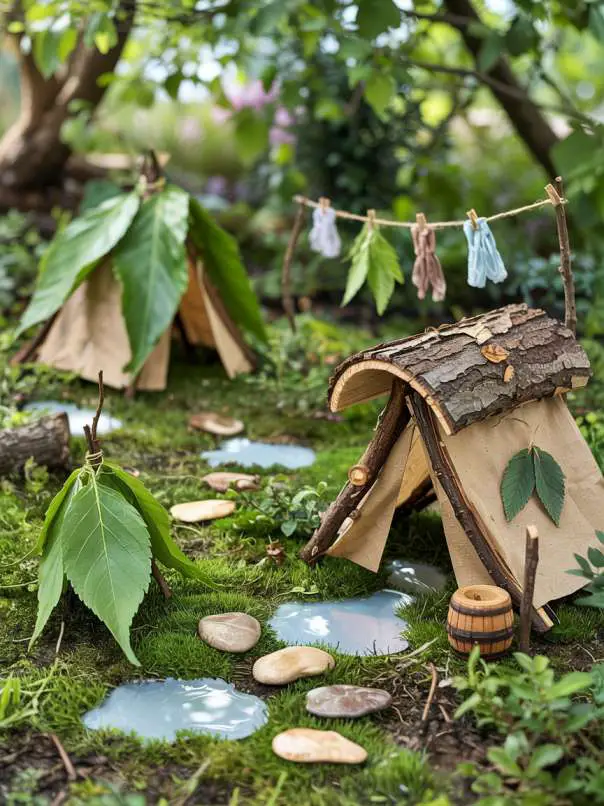
Add acorn cap “bowls” or tiny tin containers as cookware near the fire to suggest meal preparation is underway.
3. Pathways and Recreation Areas
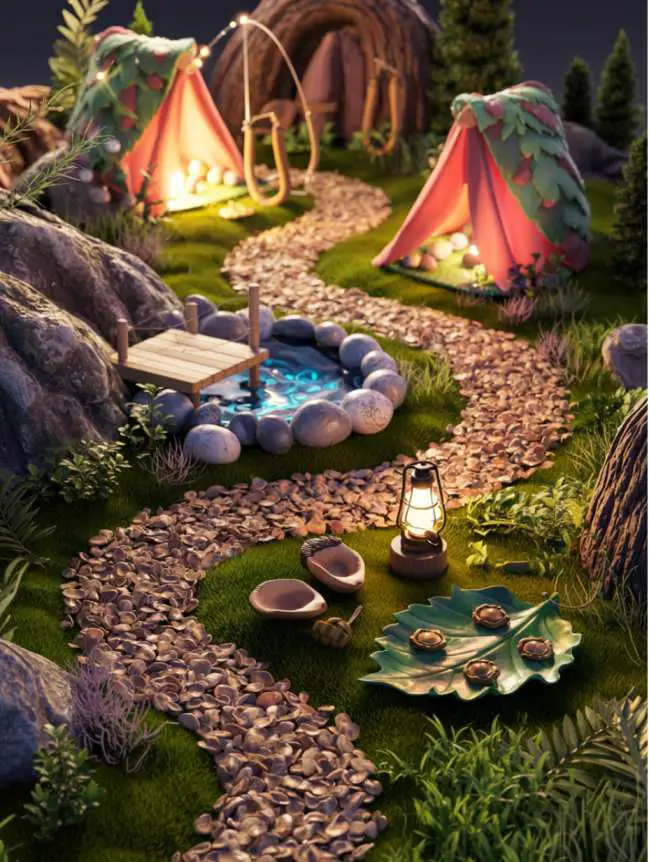
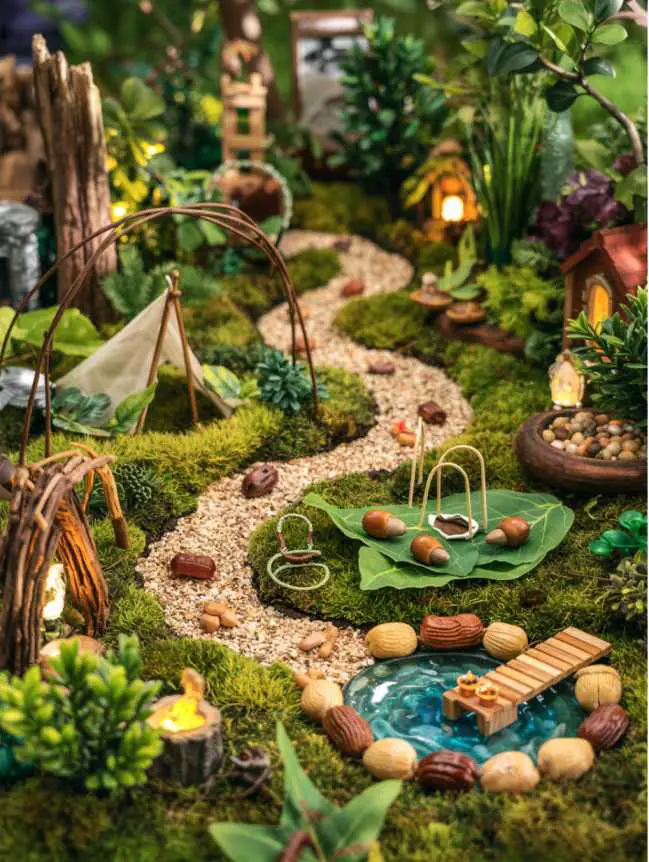
Design your fairy camping garden with thoughtful landscape elements:
- Create winding paths using fine gravel, crushed walnut shells, or sand
- Make a fairy-sized fishing dock extending into a small shallow dish of blue glass beads or resin “water”
- Add a swimming area with blue glass stones and a tiny diving board
- Craft miniature outdoor games like horseshoes using bent wire and beads
Living Elements to Bring Your Fairy Campground to Life
While miniature accessories create the camping atmosphere, it’s the living plants that truly breathe life into your fairy garden. These botanical elements transform a cute display into a thriving miniature ecosystem that changes and grows throughout the seasons. The right plant selection creates a sense of scale, adds texture and color, and provides the perfect backdrop for fairy adventures.
1. Ground Covers: Creating Fairy Meadows and Forests
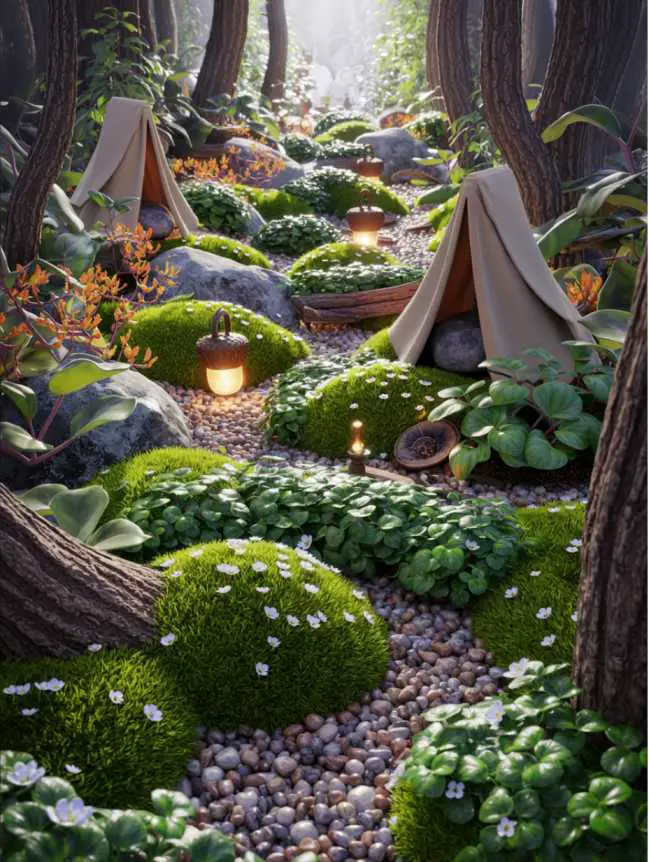
Ground covers serve as the foundation of your fairy garden’s ecosystem, creating lush carpets that suggest meadows, forest floors, or manicured campgrounds. Irish moss (Sagina subulata) creates a perfect emerald carpet with its dense, cushion-like growth habit. Its bright green color and fine texture make it an ideal grass substitute in fairy landscapes, and its tiny white flowers add delightful seasonal interest.
Baby tears (Soleirolia soleirolii) offer another excellent ground cover option with their cascading habit and tiny rounded leaves that create a lush, miniature jungle effect. This plant thrives in shadier locations and loves humidity, making it perfect for creating fairy camping scenes near water features or in woodland settings. The delicate nature of its foliage creates a perfect sense of scale for tiny accessories.
Corsican mint (Mentha requienii) not only provides a gorgeous low-growing mat of tiny leaves but adds a delightful sensory element to your fairy garden. When brushed or touched, it releases a refreshing minty fragrance, suggesting that fairies might be brewing tea or crafting aromatic potions at their campsite. Its miniature purple flowers add seasonal color while maintaining perfect fairy-scale proportions.
For fairy gardens in sunny, drier locations, consider creeping thyme varieties. Their tiny leaves, purple or white flowers, and drought tolerance make them ideal for creating meadows in more exposed fairy campsites. Many varieties like ‘Elfin’ or ‘Minor’ are specifically bred for their diminutive size, making them perfect companions for fairy gardens.
2. Miniature Trees: Enchanted Forests at Fairy Scale
Every camping scene needs a sheltering canopy of trees, and miniature varieties create the perfect sense of proportion in your fairy landscape. Dwarf Alberta spruce (Picea glauca ‘Conica’) grows very slowly with a perfect conical shape, making it an ideal evergreen tree for fairy gardens. Its soft needles and beautiful form suggest pine forests where fairies might gather pine nuts or hang tiny lanterns.
For a more architectural look, consider miniature jade plants (Crassula ovata ‘Minima’). Their thick, woody trunks give the appearance of ancient trees, while their rounded succulent leaves create perfect canopies for shade-seeking fairy campers. Their low water requirements make them practical for many garden settings.
Miniature Japanese maples like ‘Beni-hime’ or ‘Shaina’ provide seasonal color changes that can transform your fairy camping scene throughout the year. Their delicate leaves and naturally bonsai-like growth habits create perfectly proportioned trees that suggest ancient forests reduced to fairy scale.
For flowering tree options, consider dwarf azaleas or miniature roses, which provide beautiful seasonal blooms while maintaining appropriate proportions. Their flowers can suggest fruit trees or flowering forests where fairies might gather for springtime celebrations around the campfire.
3. Flowering Plants: Colorful Wildflower Meadows
Flowering plants add seasonal color and interest to your fairy camping garden while providing storytelling opportunities—perhaps the fairies harvest the blooms for dyes, medicines, or decorations. Dwarf varieties of asters (Aster alpinus), with their daisy-like flowers in purples and pinks, create charming wildflower fields at perfect fairy scale.
Miniature violets (Viola sororia) offer heart-shaped leaves and delicate purple, white, or yellow flowers that suggest spring meadows perfect for fairy picnics or gatherings. These hardy perennials often self-seed, creating naturalized areas that change slightly each year, adding to the organic evolution of your fairy garden.
Forget-me-nots (Myosotis sylvatica) produce clouds of tiny blue flowers that create magical-looking meadows in spring. Their diminutive size makes them perfect for fairy landscapes, and their prolific self-seeding nature means your fairy garden will evolve naturally over time.
For sunny fairy campsites, consider miniature varieties of sedum like ‘Little Missy’ or ‘Tom Thumb,’ which produce tiny star-shaped flowers above succulent foliage. These drought-tolerant plants add both textural interest and seasonal color while requiring minimal care—perfect for busy fairy gardeners.
4. Succulents: Sculptural Elements with Minimal Care
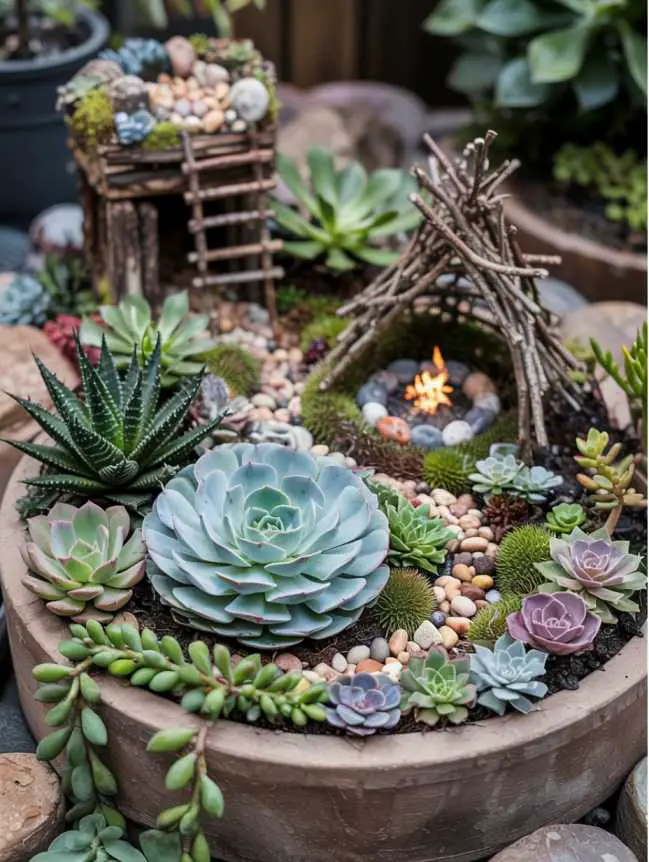
Succulents offer some of the most interesting and low-maintenance options for fairy gardens. Their architectural forms and unusual textures can suggest alien landscapes or sculptural rock formations around which fairies might camp. Haworthia varieties, with their translucent striped leaves, create fascinating structural elements while remaining small enough to maintain proper scale.
Echeveria varieties form perfect rosettes that can suggest giant lotus flowers or unusual geological formations in your fairy landscape. Their subtle color variations—from silvery blue to pink-tinged green—add depth to your garden palette without overwhelming the miniature scene.
String of pearls (Senecio rowleyanus) with its cascading beaded stems creates wonderful hanging elements, perhaps suggesting magical bead curtains or decorative elements around fairy tents. This plant works beautifully trailing over the edges of containers or down miniature cliff faces in multi-level gardens.
Crassula ‘Baby Necklace’ produces tiny stacked leaves that maintain perfect proportions for fairy spaces. Its compact growth habit makes it ideal for creating hedge-like divisions between different camping areas or as decorative plantings around fairy structures.
5. Sensory Plants: Adding Touch and Fragrance
Incorporating plants that engage the senses adds another dimension to your fairy camping garden. Miniature varieties of herbs like woolly thyme provide interesting textures that suggest soft carpets outside fairy tents, while releasing gentle aromas when touched, suggesting fairy cooking activities.
Chamomile, with its tiny daisy-like flowers and apple scent, creates delightful sensory meadows that might suggest where fairies brew their evening tea. Its soft foliage and sweet fragrance add a magical element to your miniature world.
For fairy gardens with a tropical camping theme, consider miniature varieties of scented geraniums. Their various fragrances—from lemon to rose to chocolate—create different atmospheric effects, while their textured leaves add visual interest at perfect fairy scale.
6. Maintenance and Care Considerations
When selecting plants for your fairy garden, group varieties with similar water and light requirements to simplify care. Consider the mature size of each plant, as some “miniature” varieties may still outgrow your fairy landscape over time. Regular pruning and shaping help maintain the perfect fairy scale and prevent larger plants from overwhelming delicate accessories.
For seasonal interest, incorporate plants with different blooming periods or foliage changes. This creates a dynamic landscape that evolves throughout the year, suggesting that your fairy campers might be experiencing the changing seasons just as we do.
Remember that living plants make your fairy garden an evolving artwork rather than a static display. Embrace this organic quality—as plants grow, shift, or occasionally need replacement, your fairy camping story can evolve as well. Perhaps a fallen leaf becomes a new bridge, or an unexpected seedling suggests a new direction for your miniature landscape.
By thoughtfully combining these living elements with your miniature camping accessories, you create a magical world that bridges imagination and nature—a tiny landscape where fairy adventures unfold amid the genuine wonder of growing things.
DIY Accessories for Your Fairy Camping Adventure
Creating your own accessories for a fairy camping garden adds a personal touch that manufactured items simply can’t match. These handcrafted elements tell stories through their materials and craftsmanship, making your miniature world uniquely yours. Beyond saving money, DIY accessories allow you to perfectly match the scale and aesthetic of your particular fairy garden while recycling materials that might otherwise be discarded.
Rustic Furniture: Comfort for Camping Fairies
1. Twig Chairs and Tables
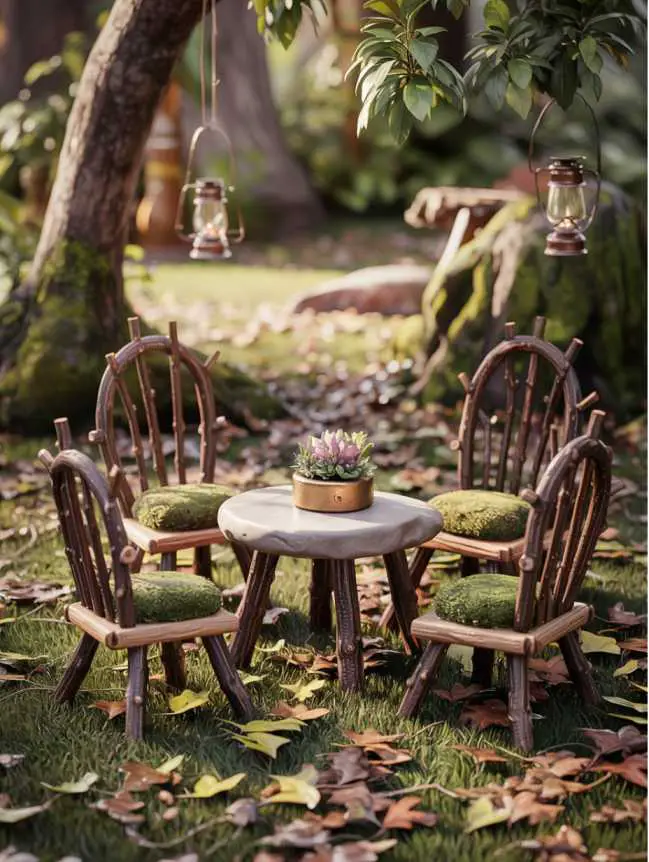
The quintessential fairy camping furniture begins with twigs collected from your own yard or local parks. Select sticks of similar diameter—thinner ones for chair legs and backs, slightly thicker ones for table supports. Look for naturally forked branches that create perfect Y-shapes for chair backs or table braces.
For basic twig chairs, cut four equal pieces about 1-2 inches long for legs. Cut two slightly longer pieces for the chair back supports, and several shorter pieces for the seat and back slats. Using a small dot of waterproof wood glue at each junction, assemble the frame, then add the slats across the seat and back. Tweezers can help with precise placement of these tiny elements.
For more elaborate throne-like chairs, incorporate interesting twig formations that suggest natural armrests or decorative elements. Add miniature cushions made from small scraps of waterproof fabric or dried moss glued to the seat for extra fairy comfort.
2. Stone and Twig Tables
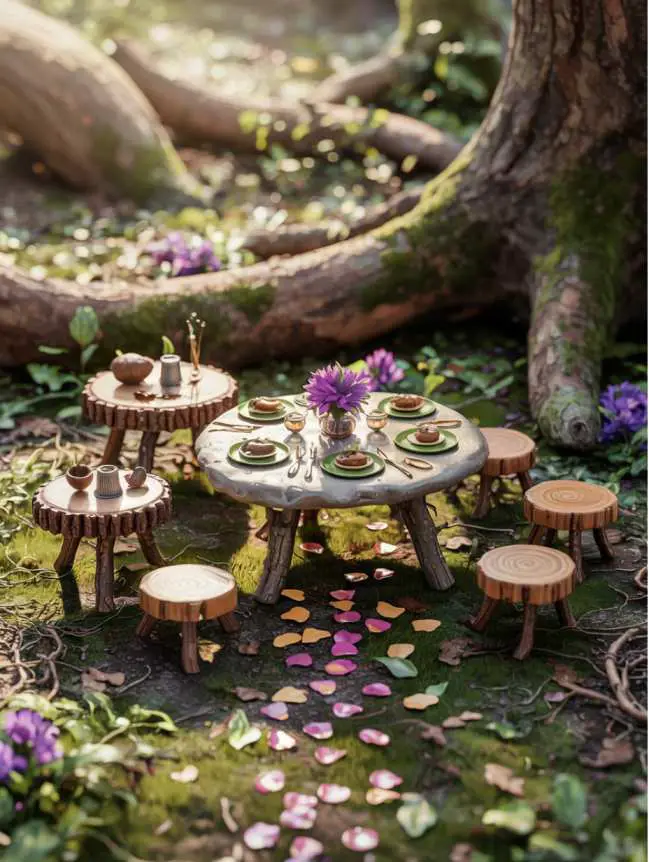
Flat stones make perfect tabletops when paired with twig legs. Look for naturally smooth stones in interesting shapes—round ones for dining tables, rectangular ones for buffet or serving tables. Attach three or four twig legs to the underside of the stone using waterproof outdoor adhesive, creating a stable base.
For coffee tables or side tables, slice a small section from a branch approximately 1/2-inch in diameter. Sand the top surface smooth while leaving the bark intact around the edges for rustic charm. Add three twig legs for stability, or use a slightly wider section of branch as a solid pedestal base.
3. Bark Benches
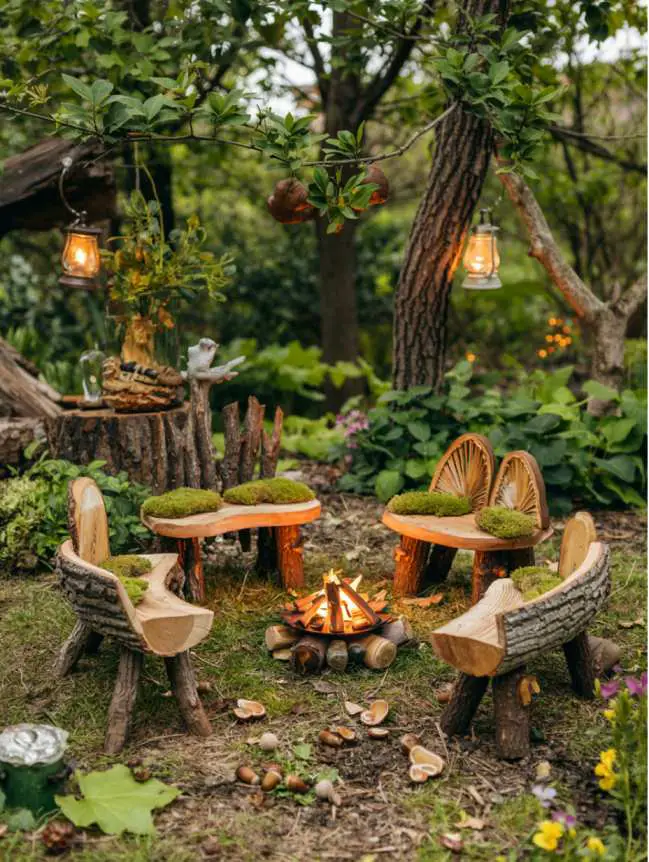
Tree bark provides excellent material for fairy benches. Look for pieces of fallen bark with naturally curved shapes that suggest seating. Cut small twig legs and attach them to the underside with waterproof glue. For added detail, create backrests using thinner bark pieces or arrange several twigs in a fan pattern attached to the rear of the bench.
4. Acorn Cap Furnishings
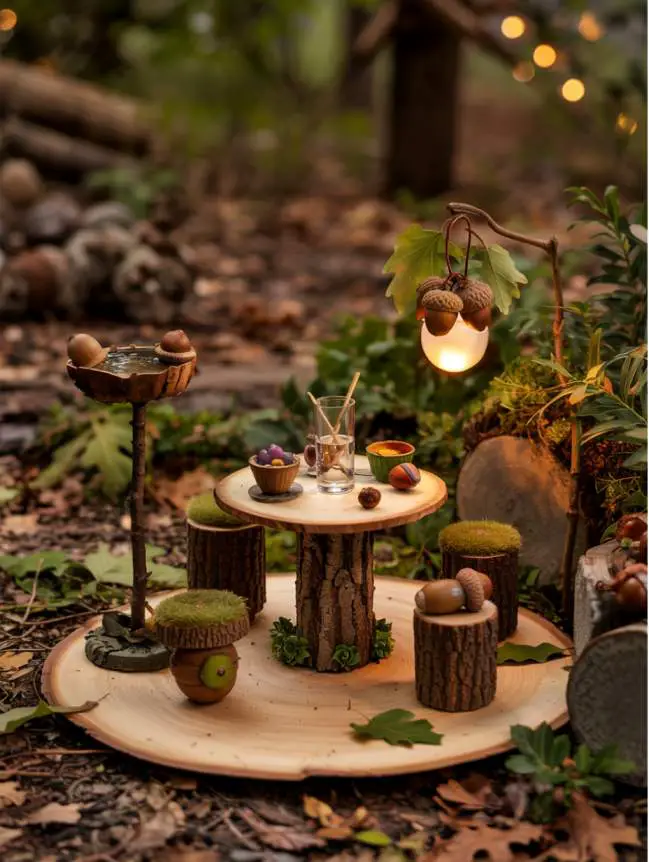
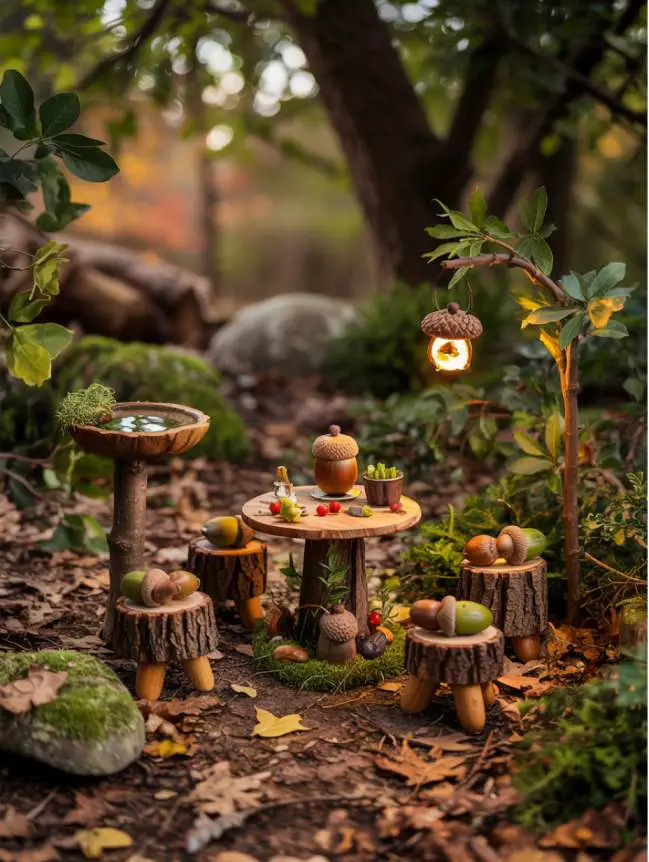
Acorn caps make perfect fairy bowls, birdbaths, or tiny tables. For birdbaths, attach an acorn cap to a twig pedestal and fill with clear resin or glossy dimensional paint to suggest water. For serving bowls, leave the acorn caps natural or paint the interiors with waterproof paint in bright colors. A collection of these on a twig table suggests a fairy feast in progress.
Shelters: Homes Away from Home
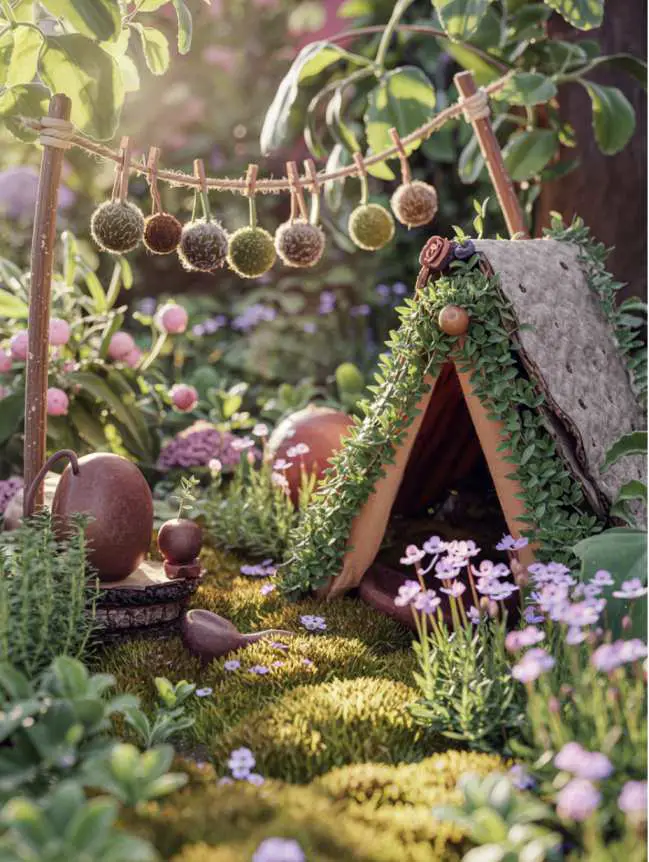
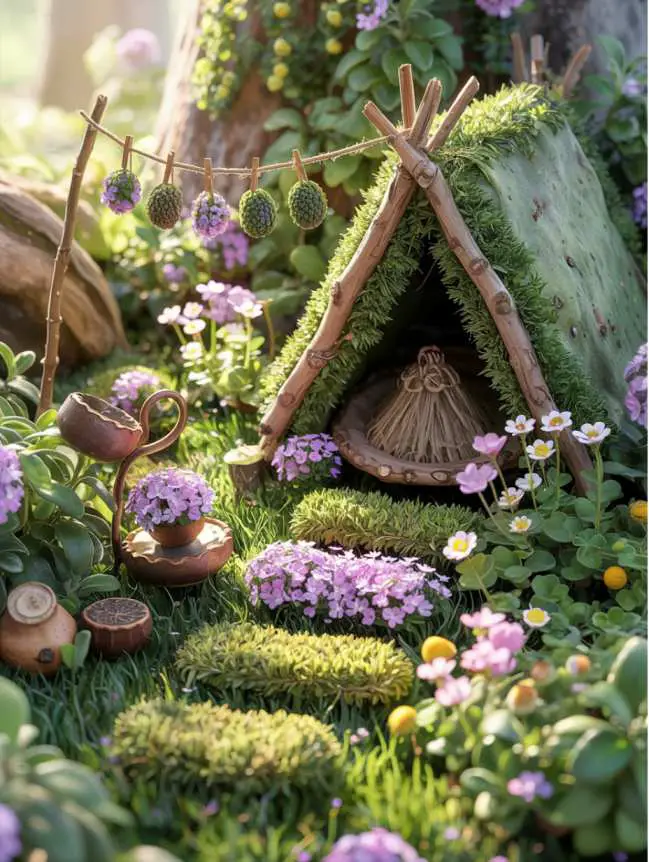
1. Twig and Fabric Tents
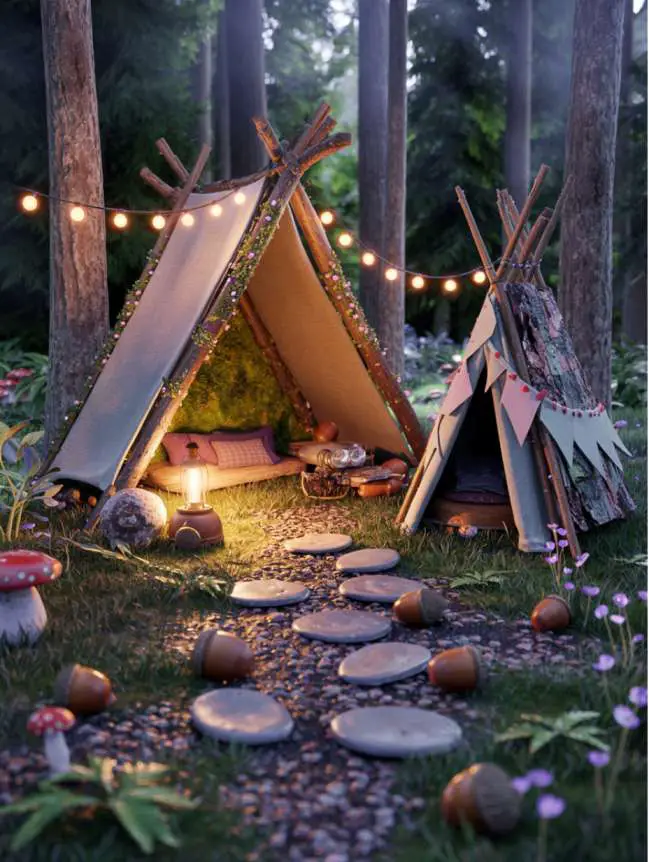
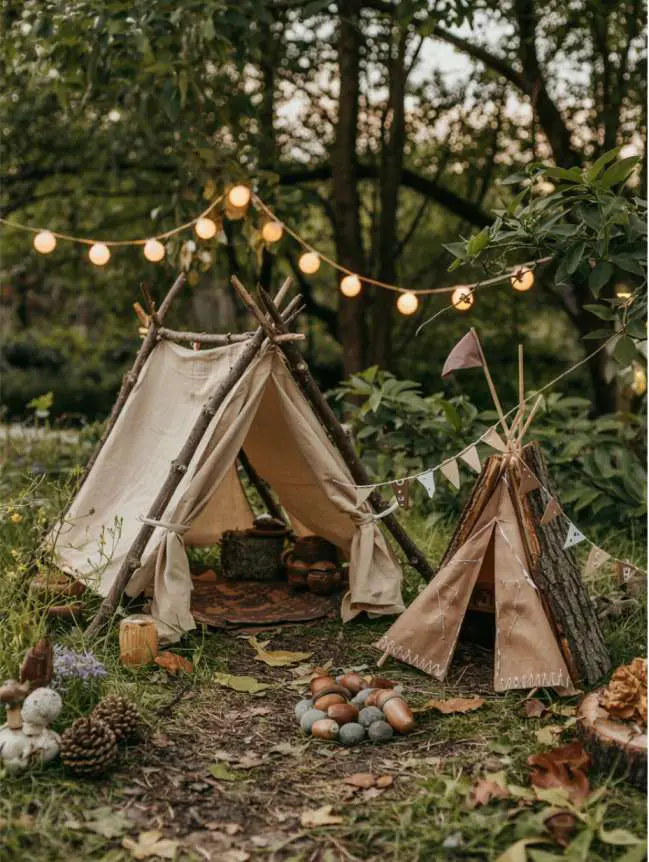
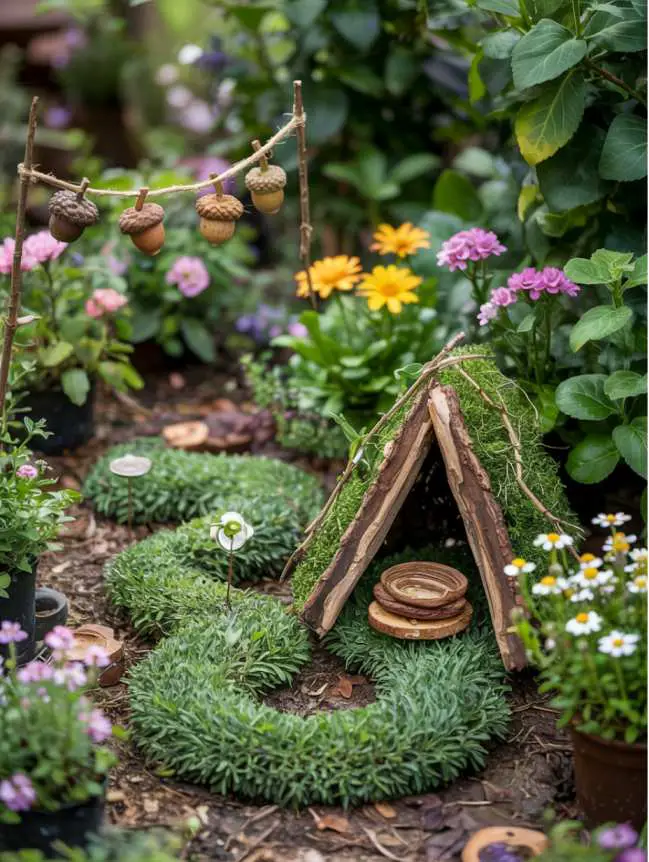
The classic fairy camping tent starts with a simple A-frame structure. Cross two pairs of twigs to create two X-shapes, then lay a longer twig across the tops as a ridge pole. Cover this frame with small pieces of canvas, cotton, or waterproof fabric, securing the material with tiny dots of fabric glue. Leave one side partially open as an entrance, perhaps tied back with a miniature rope made from twisted embroidery floss.
For more elaborate structures, create teepees by arranging 5-6 twigs in a cone shape, tied together at the top with fine thread or wire. Cover with a circular piece of fabric with a section cut out, wrapped around the frame and secured with glue. Add painted details or tiny flags at the top for extra character.
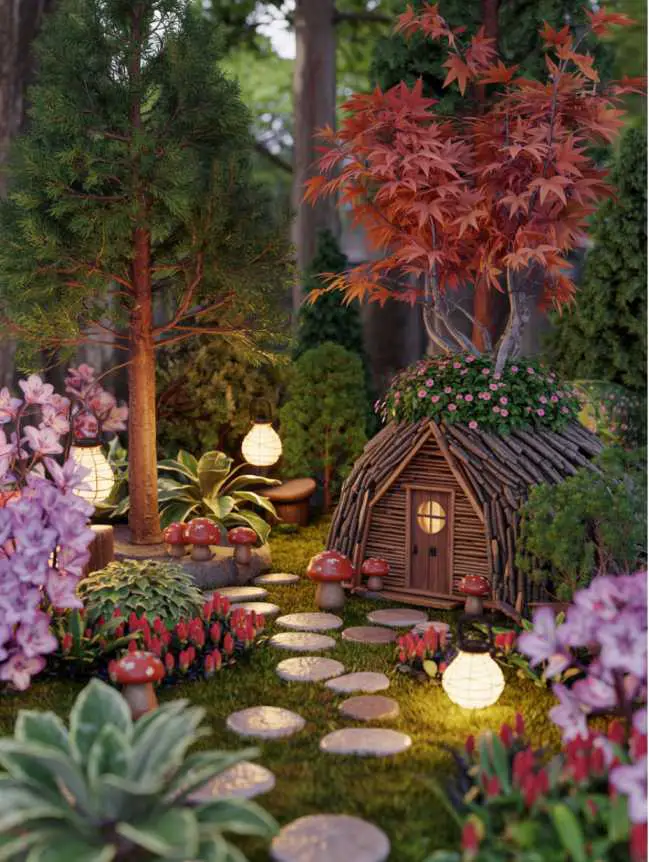
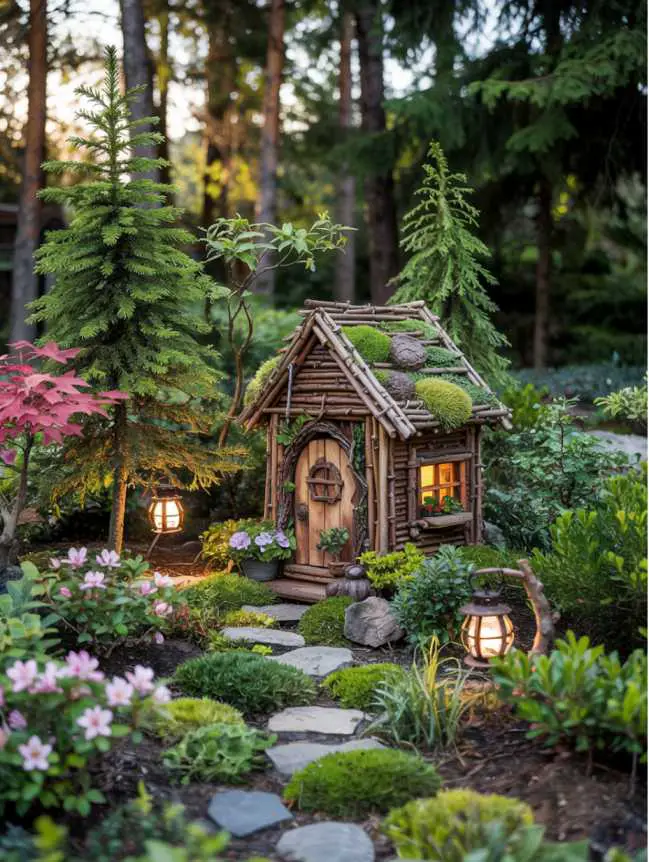
2. Natural Material Dwellings
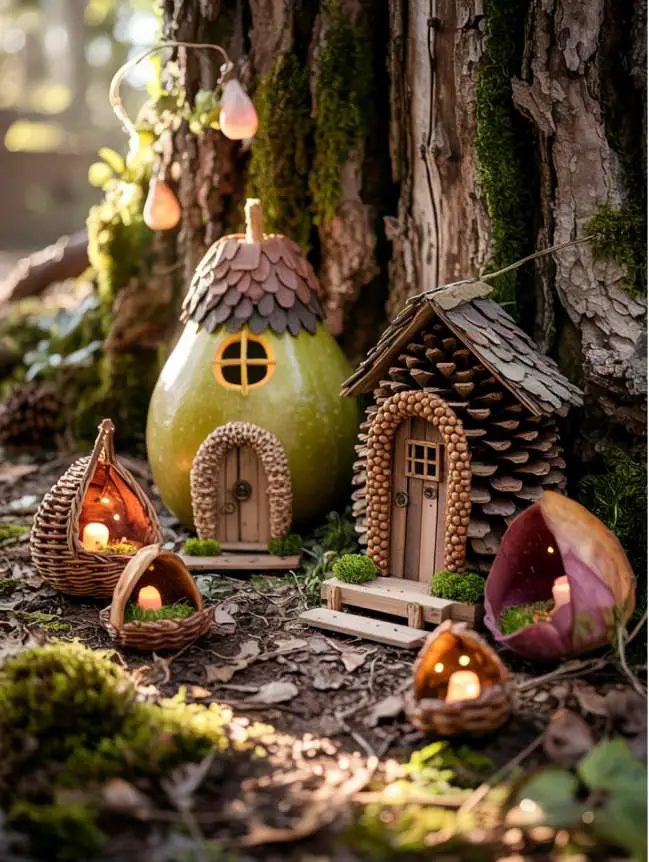
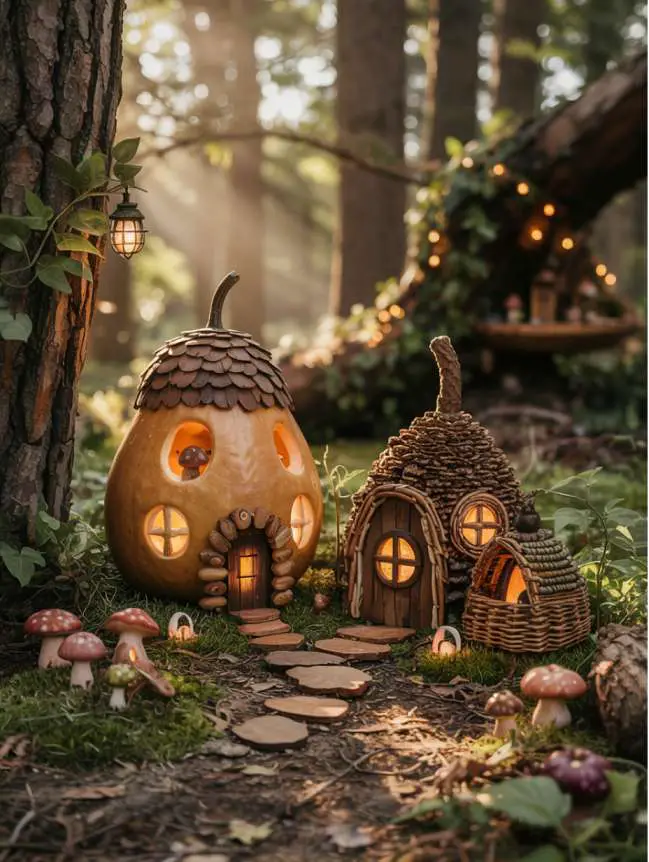
Hollowed-out gourds, when dried and sealed, make wonderful fairy camping pods. Cut a doorway and windows, then finish the interior with tiny furnishings like acorn cap tables or moss bedding. The curved shape suggests whimsical fairy architecture perfect for temporary camping shelters.
Large pinecones positioned horizontally create instant fairy cabins. The natural scales suggest rustic shingles, while the hollow interior offers perfect shelter. Add a small door cut from bark and tiny windows made from translucent mica or plastic for a more finished appearance.
3. Basket Cabins
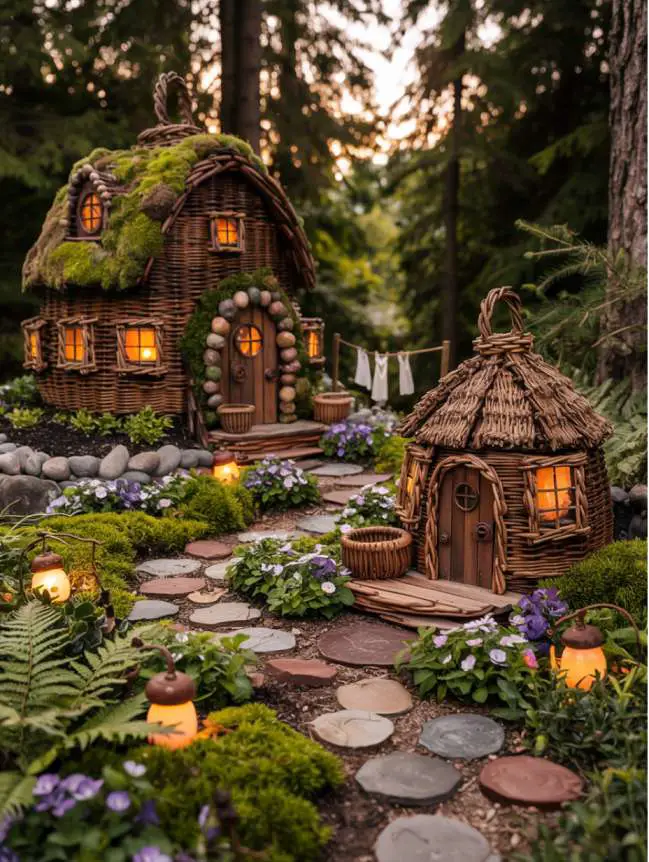
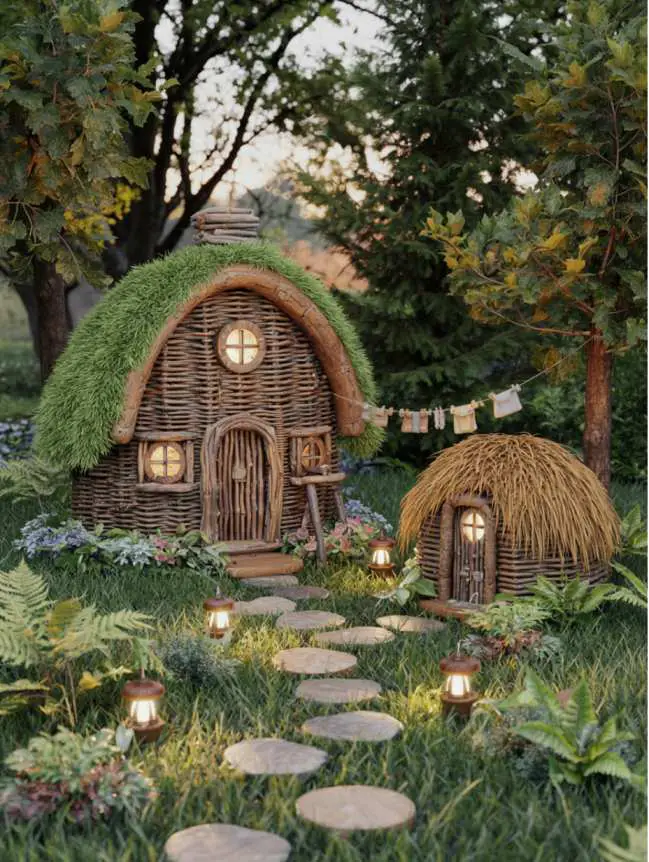
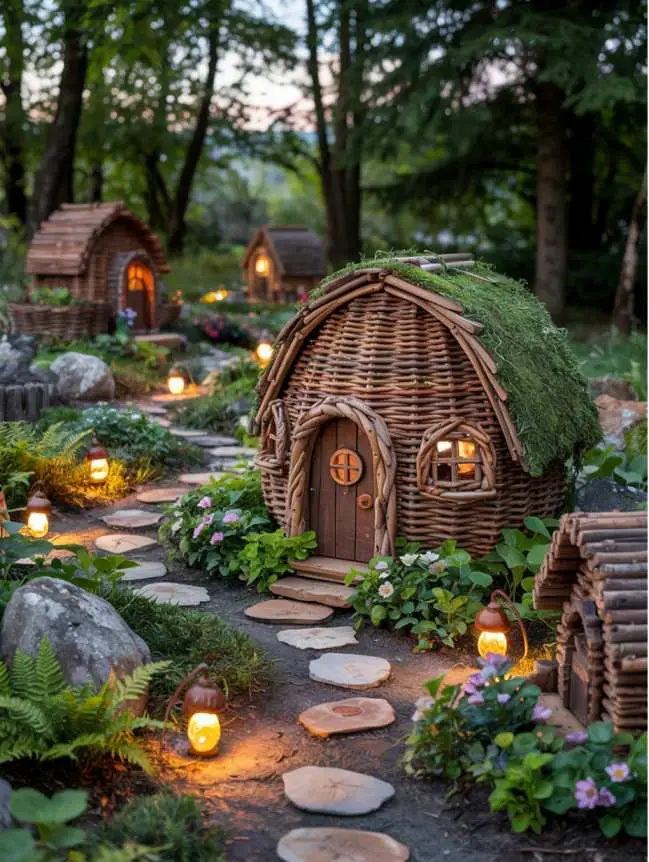
Small woven baskets turned upside down with doors and windows cut into the sides make charming fairy cabins. Add a thatched roof effect by gluing dried moss, grass, or small twigs across the top surface. Create a doorway by cutting a small arch and adding a rustic door made from popsicle sticks or bark.
For a more elaborate structure, add a porch using small twigs as posts supporting a roof extension. Create tiny steps leading to the entrance using small stones or sections of twig arranged as stairs.
Pathways and Borders: Defining the Fairy Campground
1. Stone Pathways
Collect flat stones of similar thickness but varying shapes and sizes to create natural-looking pathways through your fairy garden. Press these slightly into the soil in a meandering pattern, suggesting trails between different camping activity areas. For a more polished look, use aquarium gravel or crushed stone in a single color, edged with slightly larger stones for definition.
For truly miniature paths suitable for the smallest fairy gardens, crushed eggshells, fine sand, or coffee grounds create scaled-down walkways. Apply a thin layer of outdoor mod podge after placing these materials to prevent washing away during watering.
2. Twig Borders and Fences
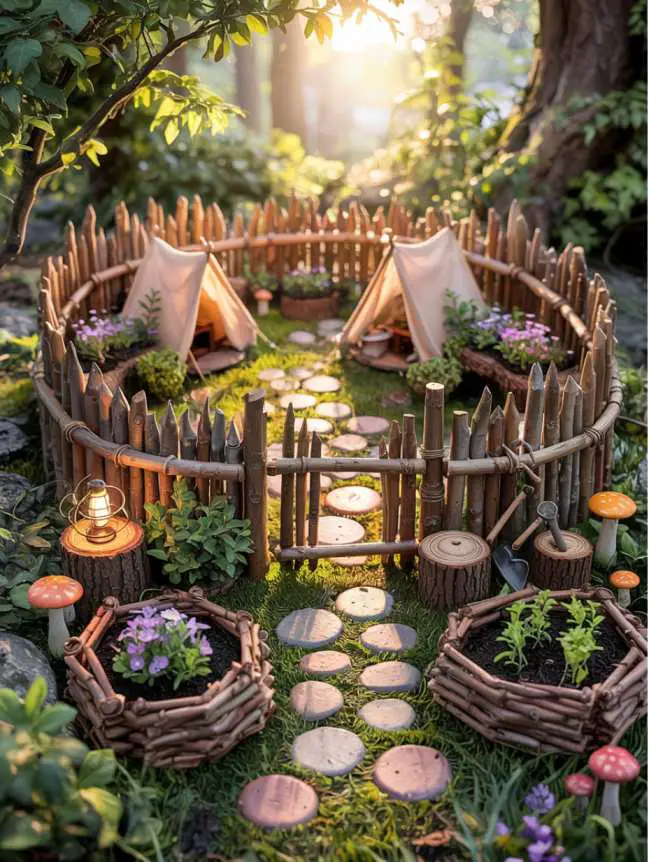
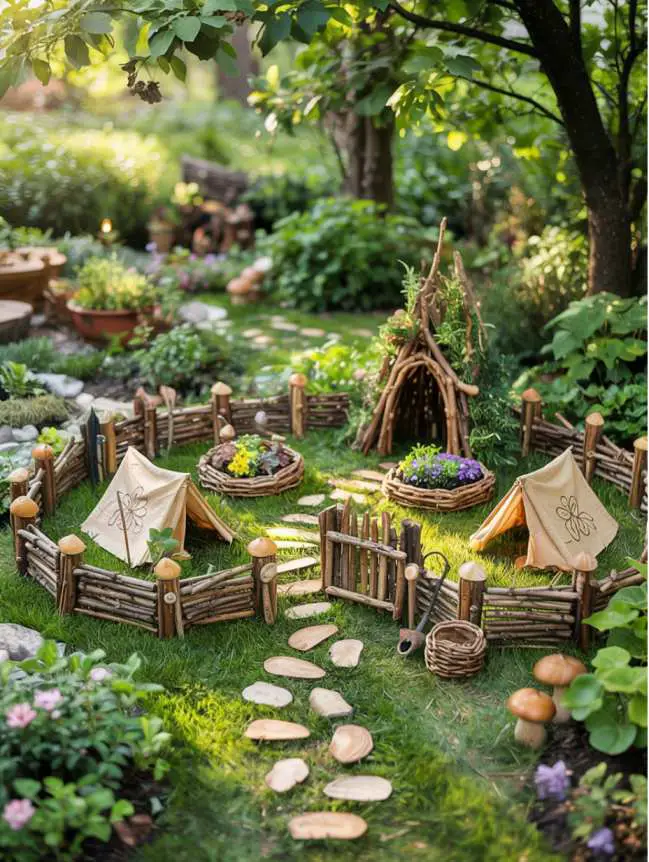
Create rustic borders around camping areas by inserting small twigs of equal height vertically into the soil, spacing them evenly to suggest a fence. For a more finished look, add horizontal twigs across the tops, attached with tiny dots of glue.
For decorative garden borders, cut twigs into 1-inch sections and place them horizontally in a row, partially buried in the soil for stability. These create a natural edge defining different areas of your fairy campground, such as separating the tent area from the communal dining space.
3. Rope Bridges and Ladders
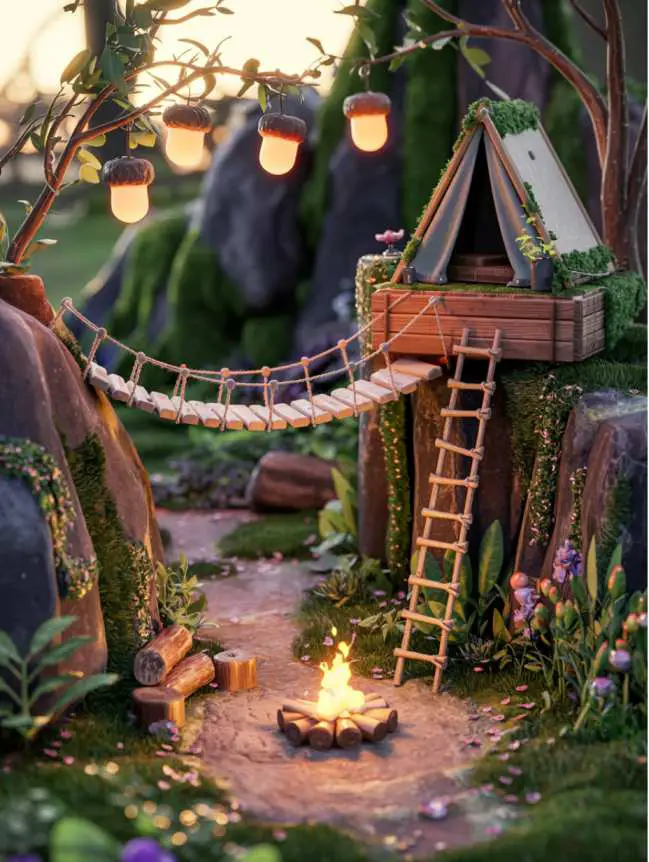
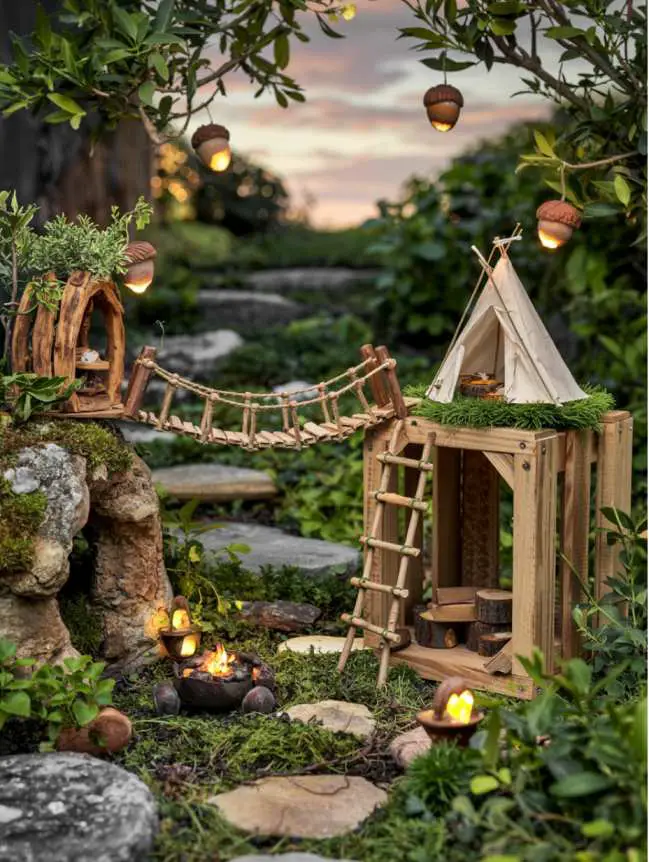
Connect different levels in your fairy garden with miniature rope bridges. Use two longer twigs as support beams, then create the bridge deck by gluing popsicle sticks cut into small sections across the supports. Add side railings using thin twine or embroidery floss strung between small vertical twig posts.
Create ladders by cutting two thin twigs of equal length for the sides, then attaching smaller crosspieces using small dots of glue. Position these against stones or between different garden levels to suggest fairy access routes to difficult terrain.
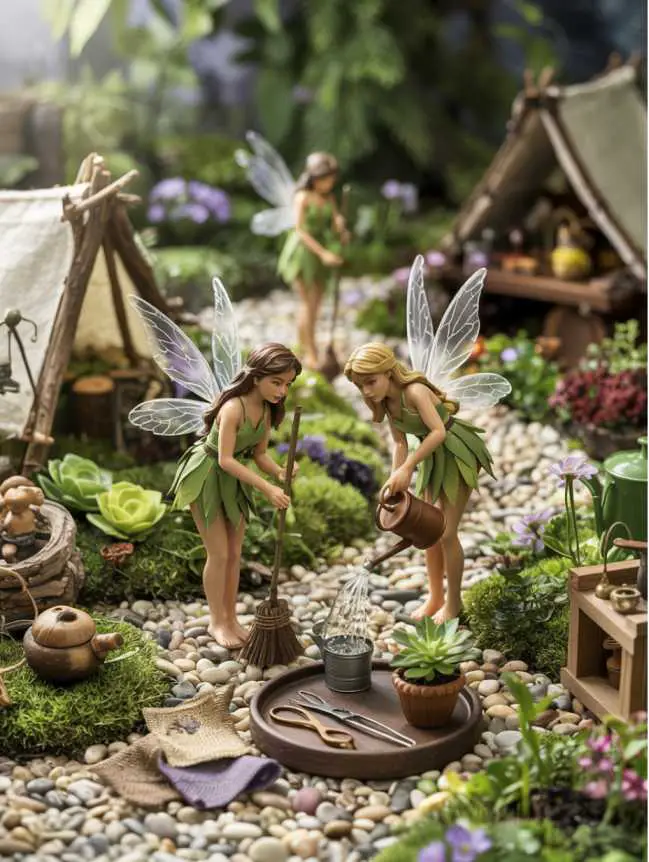
Fairy Camping Activities: Bringing the Scene to Life
1. Miniature Campfire Sets
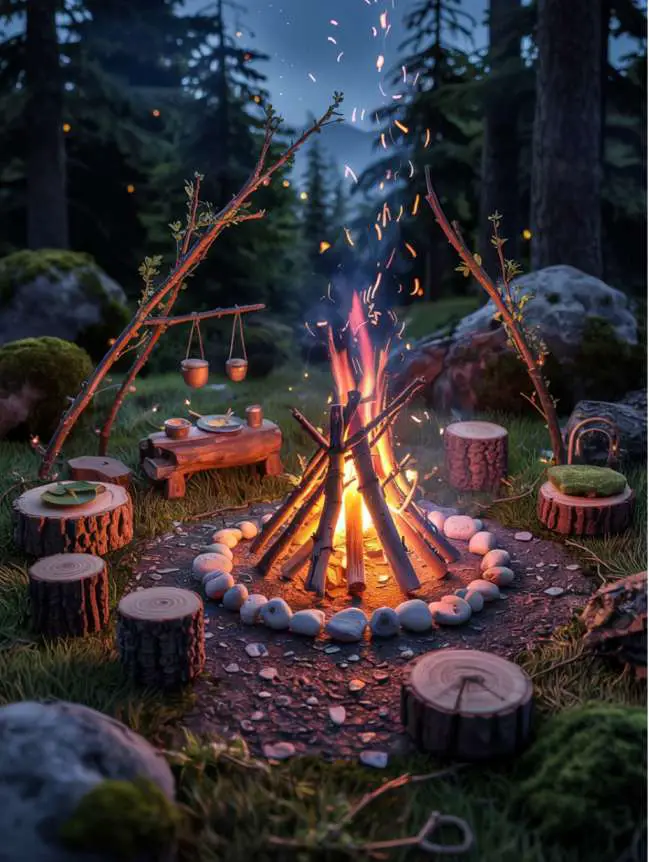

Create a realistic fairy campfire by arranging small pebbles in a circle, then placing tiny twigs in a teepee or log cabin formation in the center. For flames, use small pieces of orange and red translucent fabric or dried flower petals in flame colors. Add tiny “logs” nearby made from small twig sections, suggesting a woodpile for keeping the fire going.
For cooking equipment, bend thin craft wire to create tripods over the fire, from which tiny pots (thimbles or bottle caps) can be suspended. Create a cooking grate using mesh from an old tea strainer stretched over bent wire.
2. Fairy Sports and Recreation
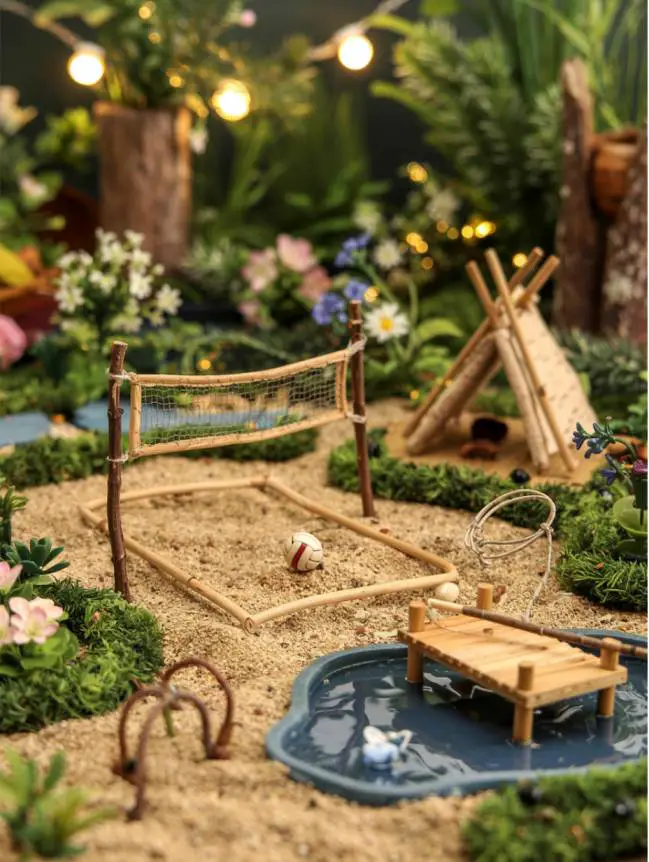
Fashion tiny fishing poles from thin twigs with thread “lines” and seed bead “hooks.” Position these near water features alongside minuscule tackle boxes made from small beads or folded paper.
Create a volleyball court using fine sand with a net made from scraps of tulle stretched between two twigs. Use a small bead as the ball, positioned strategically on one side of the net.
For fairy hikers, create tiny walking sticks from thin twigs with the bark partially removed to create a two-toned effect. Place these near backpacks or tent entrances, suggesting fairies preparing for woodland adventures.
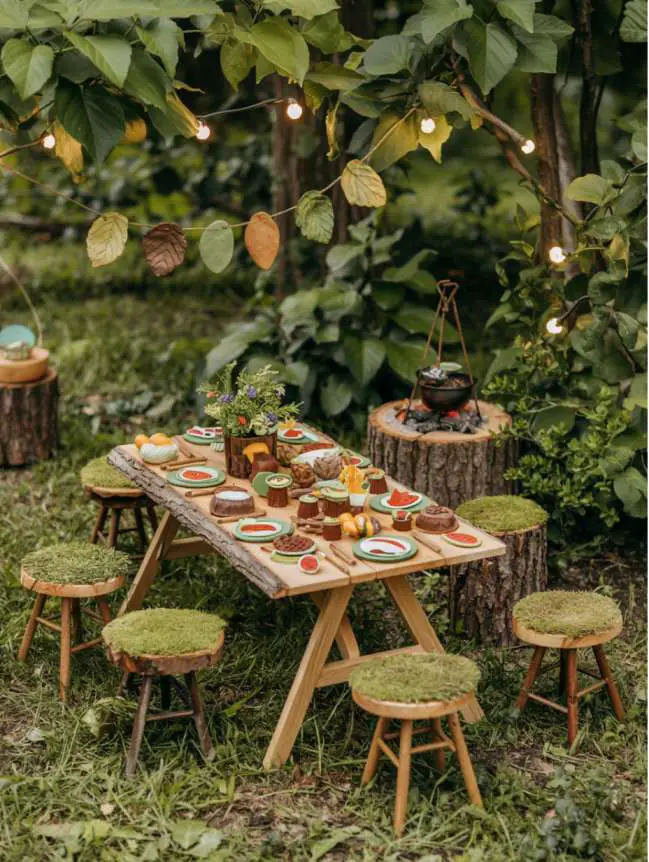
3. Picnic and Dining Areas
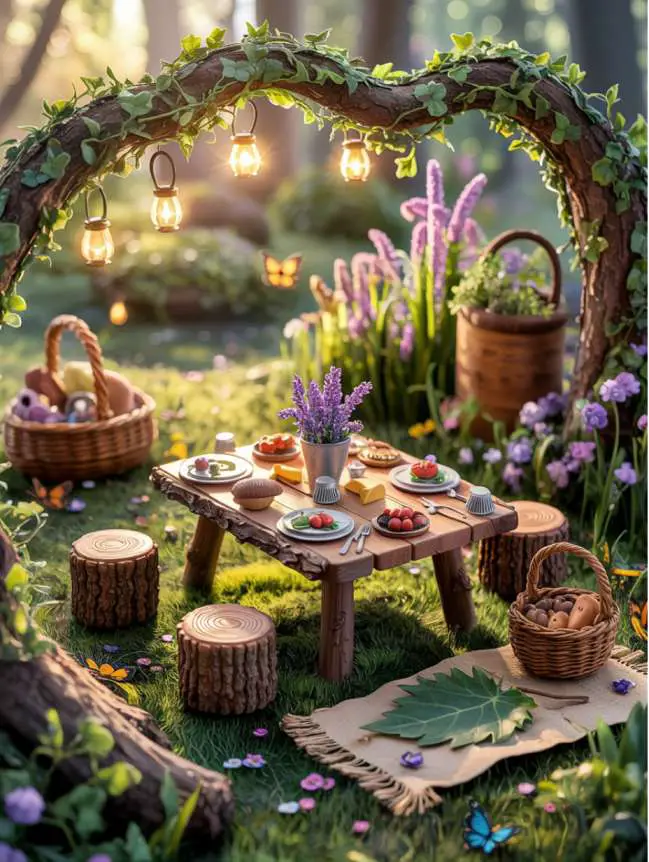
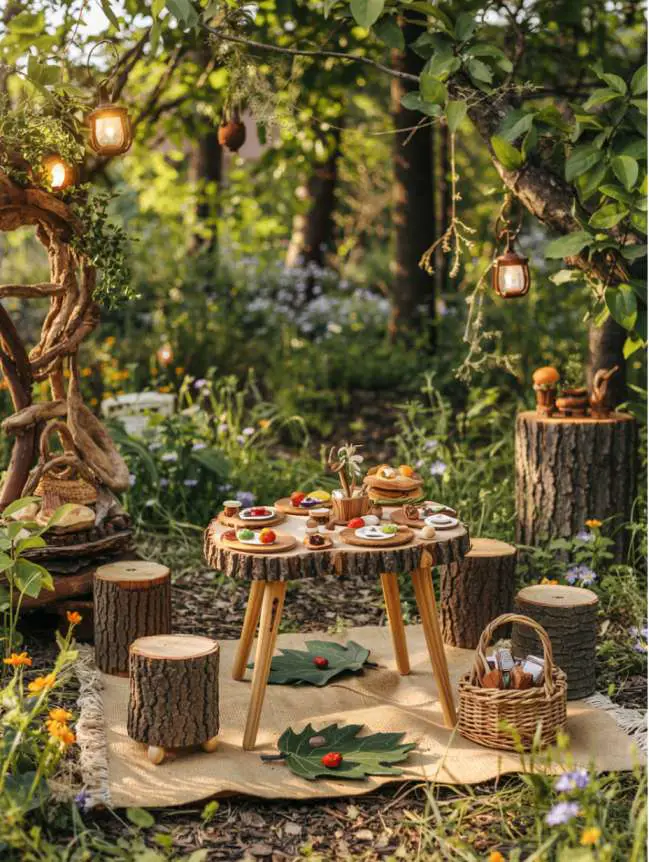
Arrange your twig furniture in a gathering area near the campfire, adding a twig table topped with acorn cap plates and tiny food items made from colored polymer clay. Create miniature food baskets from small sections of loosely woven natural fiber or tiny berry baskets.
Add weathered checkerboard patterns to flat stones using permanent markers, then position them on stumps or flat surfaces with tiny game pieces made from different colored seeds or small beads. This suggests fairies enjoying leisure time at their campsite.
Seasonal Fairy Camping Ideas
One of the most delightful aspects of fairy garden camping is the opportunity to transform your miniature landscape throughout the year. Seasonal changes reflect the natural world around us and create an evolving story that keeps your fairy garden fresh and engaging. By incorporating elements that celebrate each season’s unique character, you create a dynamic miniature world that grows and changes alongside your full-sized garden.
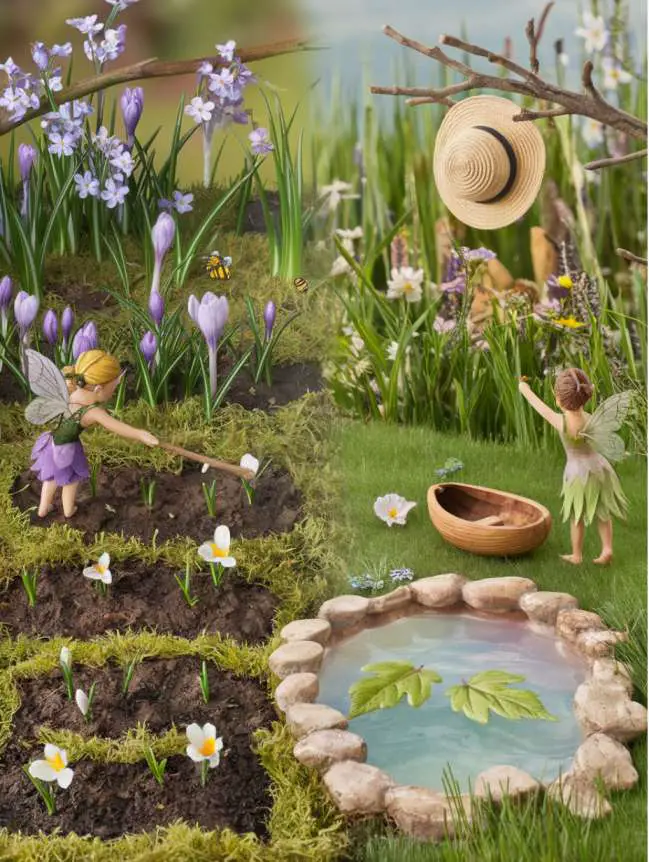
Spring: Awakening and Renewal
Spring in the fairy camping world mirrors nature’s own reawakening, with themes of growth, planting, and celebration taking center stage.
1. Spring Planting Activities
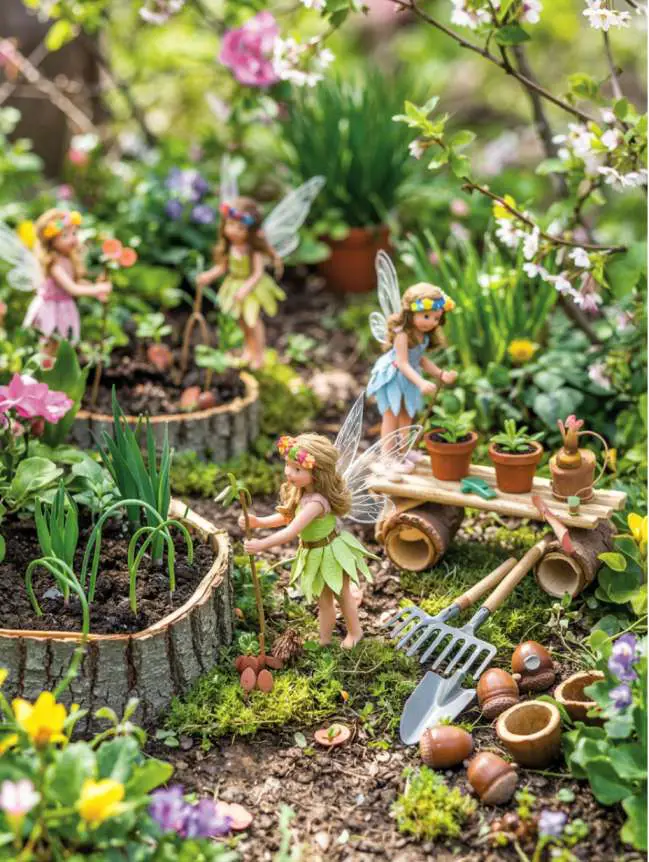
Transform your fairy camping garden into a scene of springtime industry by adding tiny gardening elements. Create miniature seed packets by folding small pieces of decorative paper and adding hand-drawn vegetable or flower illustrations. Place these near newly “tilled” areas of soil where fairies might be preparing their seasonal gardens.
Fashion diminutive gardening tools from small twigs, wire, and polymer clay. Tiny rakes can be created using fine wire bent into tines and attached to twig handles, while miniature spades come to life by flattening small pieces of metal from bottle caps attached to slender sticks. Arrange these tools near a fairy-sized potting bench made from popsicle sticks or bark.
Add miniature planters fashioned from acorn caps, small thimbles, or bottle caps filled with real soil and planted with moss or miniature succulents. Position these around the camping area, suggesting fairies preparing their seasonal decorations and food gardens.
For a whimsical touch, create tiny sprouting seedlings using small beads or polymer clay formed into seeds with green wire “sprouts” emerging. Place these in rows in freshly turned soil areas, suggesting fairy farming activities.
2. Spring Celebration Elements
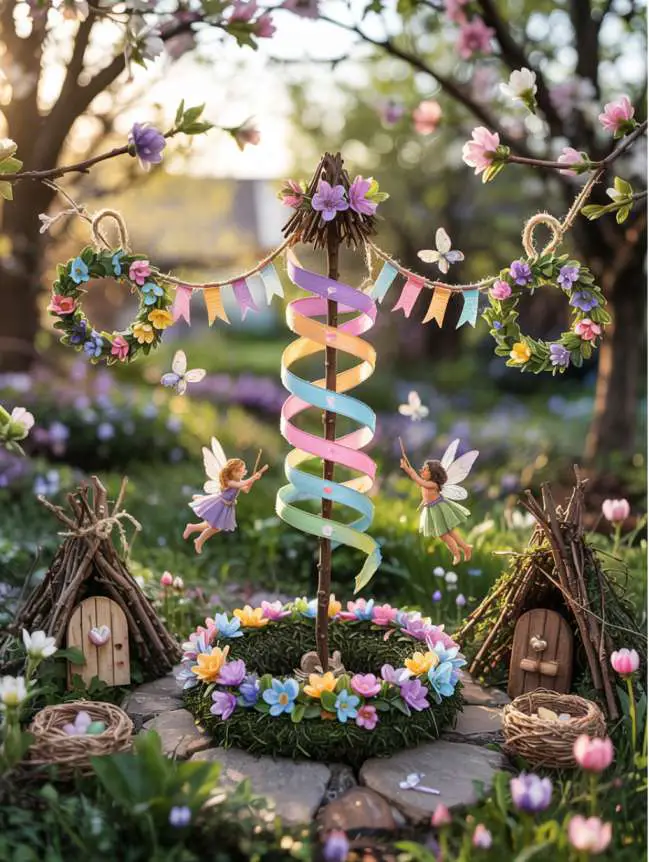
Spring celebrations hold special significance in fairy lore. Create a Maypole centerpiece for your fairy camping garden using a straight twig inserted vertically into the soil with colorful ribbons (thin strips of fabric or embroidery floss) extending from the top to the ground. Position tiny fairy figures around the base as if engaged in traditional spring dances.
Fashion miniature flower wreaths using flexible twigs or wire circles adorned with the tiniest spring blossoms—forget-me-nots, violets, or small pieces of flowering ground covers. Hang these from branches overhead or on fairy tent entrances, suggesting spring decoration parties.
Add tiny nests made from gathered moss, plant fibers, or small pieces of natural twine formed into cup shapes. Place diminutive eggs crafted from polymer clay or small beads inside, representing spring wildlife returning to the fairy campground.
3. Weather Adaptation Features
Spring’s changeable weather provides storytelling opportunities in your fairy garden. Create tiny umbrellas using round leaves attached to slender twigs, positioned near fairy tents or gathering areas to suggest preparation for spring showers.
Add miniature rain barrels made from wooden beads or thimbles positioned under “gutter” systems created from hollowed twigs or curved bark. These practical installations suggest eco-conscious fairies harvesting spring rain for their gardens and daily needs.
Create puddle features using small circles of clear resin or dimensional crystal clear paint poured into depressions in your fairy garden soil. Position stepping stones (small flat pebbles) across these water features, suggesting fairies navigating the aftermath of spring showers.
Summer: Adventure and Celebration
Summer brings peak activity to your fairy camping garden, with bright colors, water features, and outdoor adventures taking prominence.
1. Water Play Features
No summer camping experience is complete without water activities. Create a fairy swimming area using a shallow dish filled with blue glass stones or clear resin. Fashion a tiny diving board from a sliver of wood or popsicle stick extending over the water’s edge, perhaps with a ladder for access.
Add beach elements near water features using fine sand sprinkled in a small area. Position miniature beach towels made from colorful fabric scraps, along with tiny beach umbrellas created from paper or fabric circles attached to slender twigs.
For boating adventures, float walnut shell boats on water features, complete with leaf sails attached to twig masts. Add fishing areas with diminutive docks extending into water features, accompanied by the tiny fishing poles described earlier.
2. Summer Feasting Areas
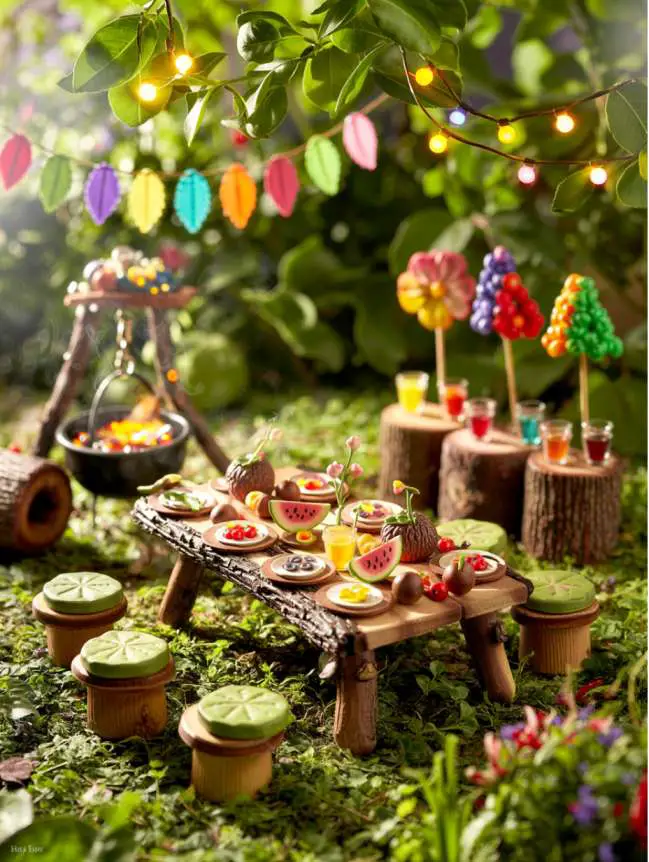
Summer in the fairy camping world means outdoor dining and celebrations. Create elaborate fairy picnic spreads using polymer clay formed into miniature fruits and vegetables displayed on leaf “blankets” or twig tables. Craft tiny watermelon slices using green and pink clay with black seed details.
Construct a miniature outdoor kitchen area with a stone grill (arranged pebbles) and tiny cooking implements. Position acorn cap cookware nearby with “food” items being prepared for summer cookouts.
Build fairy-sized lemonade or fruit juice stands using popsicle sticks, complete with tiny pitcher and cups fashioned from polymer clay or beads. Add colorful paper umbrellas or awnings to provide shade for these refreshment stations.
3. Summer Night Magic
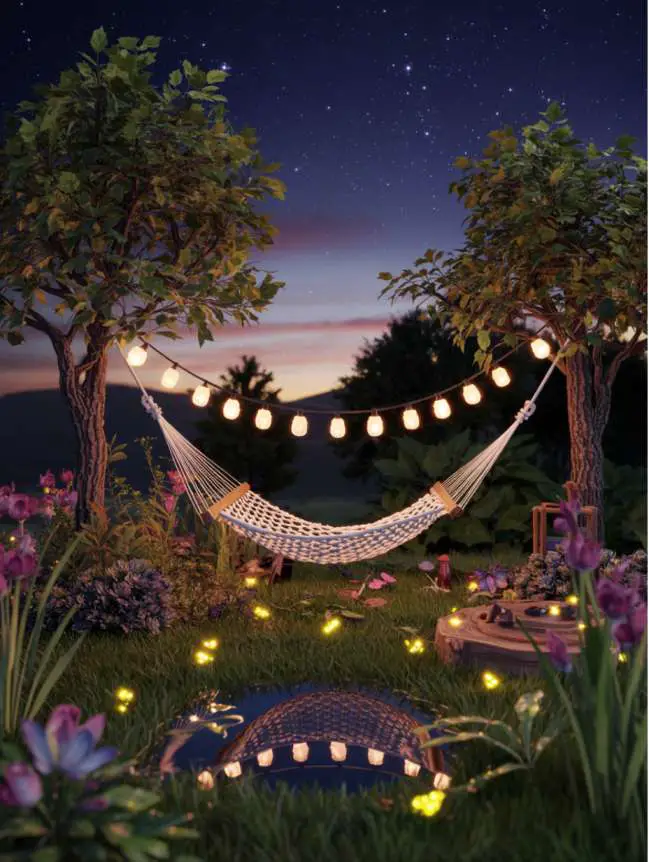
Summer evenings bring special magic to fairy gardens. Create firefly effects using tiny dots of glow-in-the-dark paint scattered among plants or suspended on nearly invisible thread among branches, suggesting summer night illumination.
Fashion miniature musical instruments like drums (from hollow beads), flutes (thin twigs with holes), or guitars (seed pods with thread strings) arranged around the campfire area, suggesting evening musical gatherings.
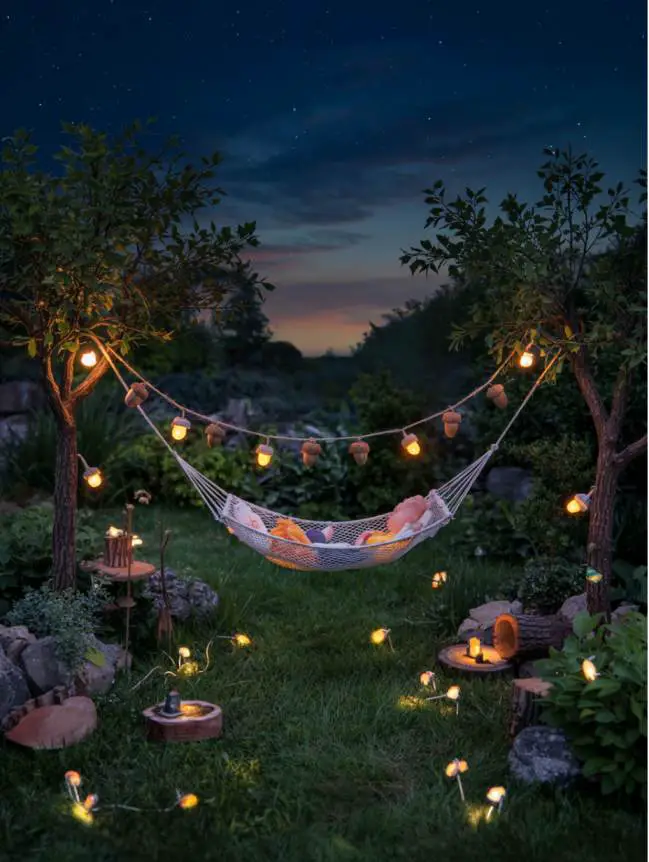
Add fairy-sized hammocks stretched between twigs or trees, crafted from pieces of fine mesh fabric or loosely woven string. Position these in shady spots for fairy afternoon napping spots during hot summer days.
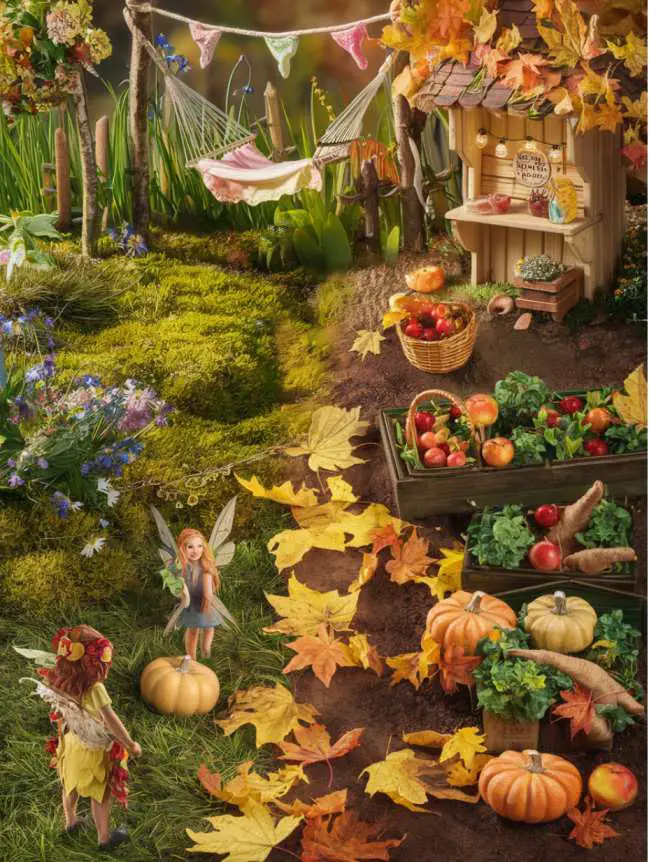
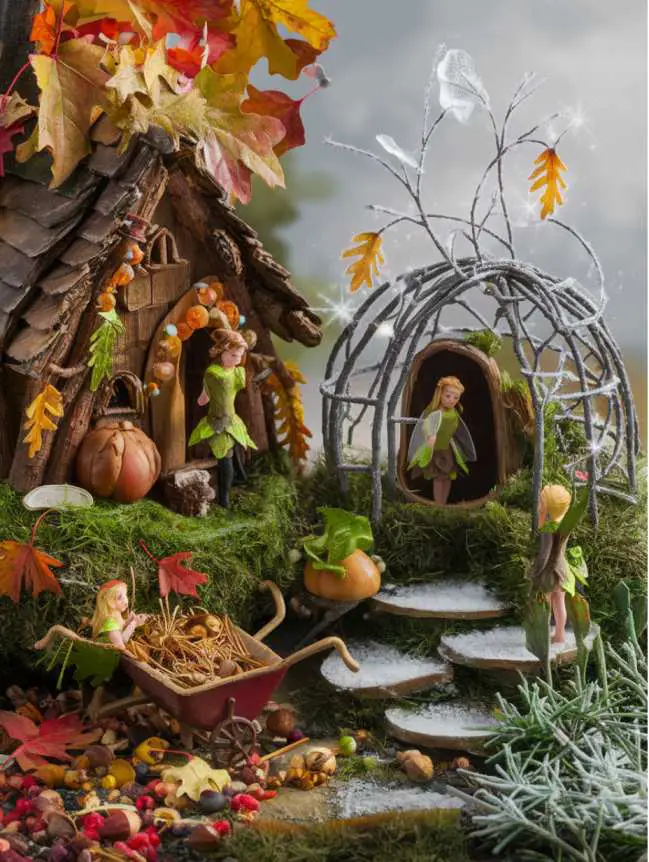
Autumn: Harvest and Transformation
As summer transitions to fall, your fairy camping garden can reflect the changing season through rich colors, harvest activities, and autumn celebrations.
1. Harvest Festival Elements
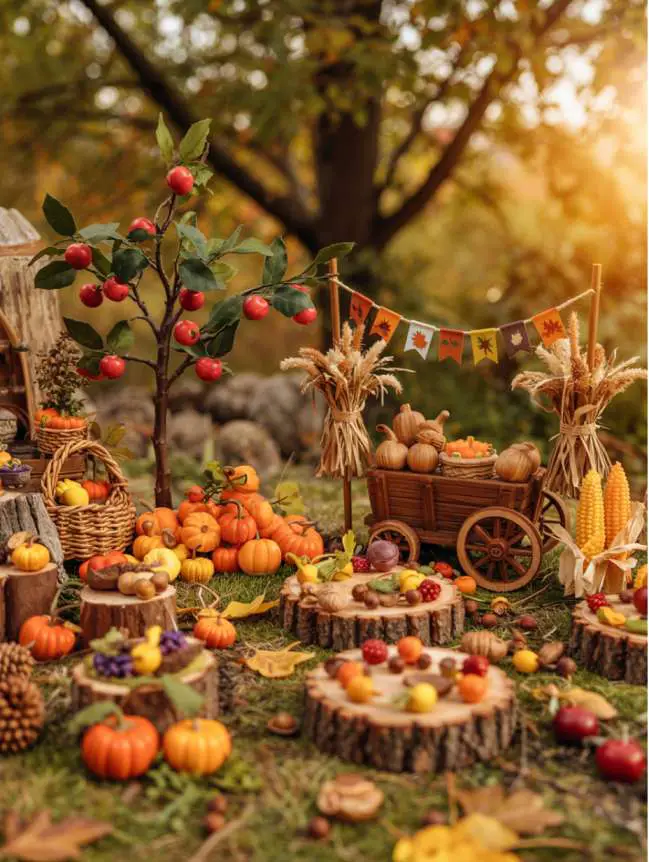
Fall brings abundant harvest opportunities to the fairy world. Create miniature pumpkin patches using tiny orange polymer clay pumpkins of various sizes, positioned in garden rows with some attached to green wire “vines.”
Fashion apple-picking scenes with diminutive apple trees (twigs with tiny red beads or polymer clay apples attached) and miniature baskets or buckets positioned below, some filled with “harvested” fruit suggesting fairy industry.
Construct tiny corn shocks by gathering dried grass or straw into miniature bundles, tied with thread and arranged in traditional patterns. Position these near fairy tent areas as decorative harvest elements.
Add tiny wheelbarrows or carts made from walnut shells with twig handles, filled with miniature harvest bounty—acorns, seed pods, or polymer clay vegetables—being transported around the camping area.
2. Autumn Decoration Activities
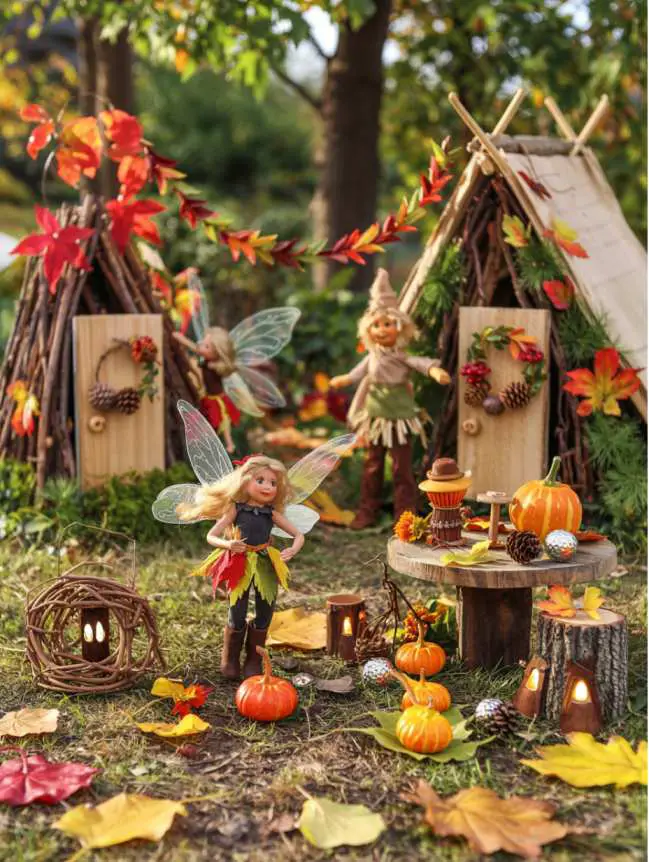
Fall decorating provides charming fairy activities. String tiny leaf garlands by threading a needle with fine thread through small, colorful fall leaves collected from your garden. Drape these between tents or trees as fairy campsite decorations.
Create miniature scarecrows using crossed twigs as frames, dressed in tiny fabric scraps with heads fashioned from small wooden beads painted with faces. Position these guarding fairy garden plots or as decorative elements near gathering areas.
Fashion fall wreaths using grapevine tendrils or flexible twigs formed into circles and decorated with miniature pine cones, seed pods, or tiny artificial fall leaves. Hang these on fairy doors or central gathering spaces.
3. Halloween and Fall Festival Features
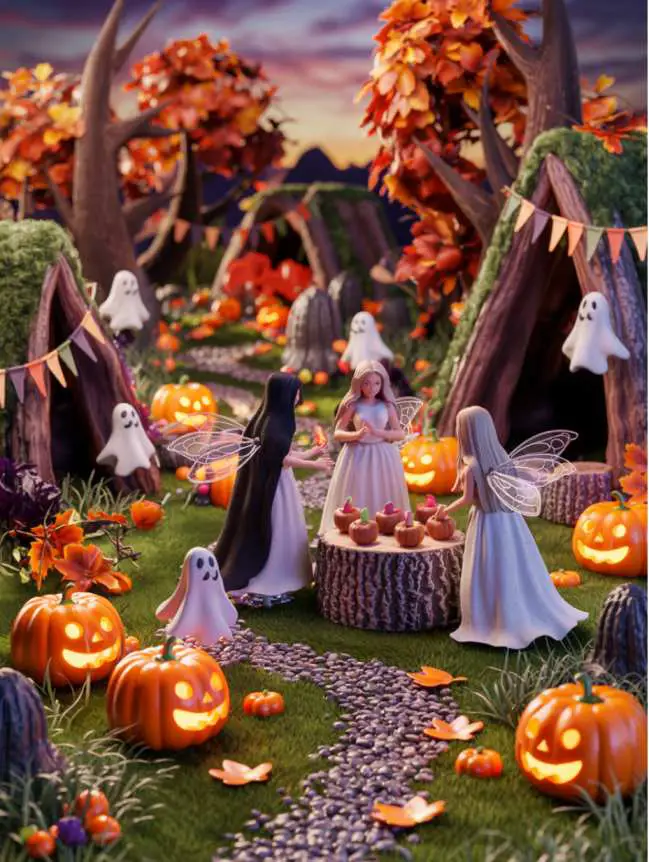
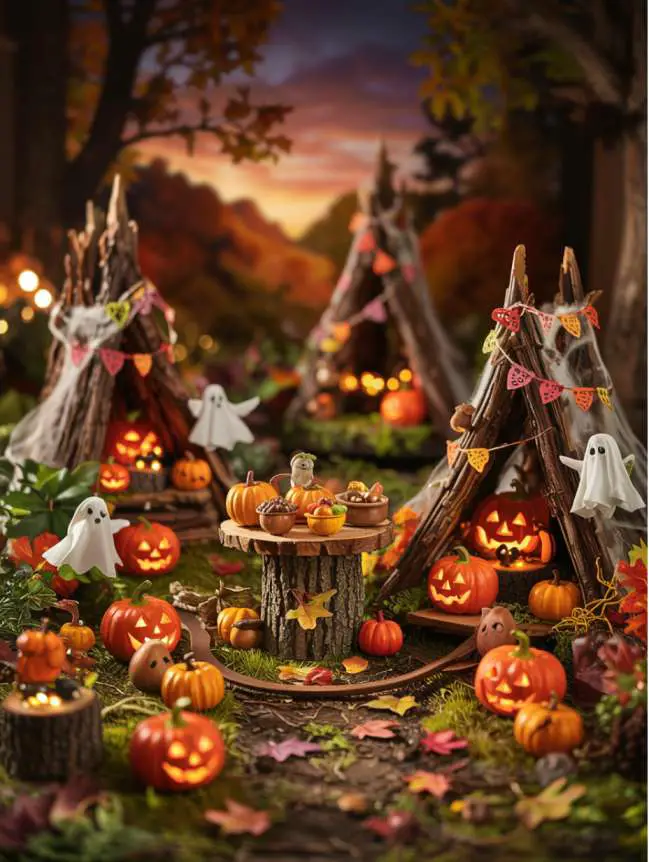
For fairy gardens maintained through October, incorporate whimsical Halloween elements. Carve tiny jack-o’-lanterns from small orange beads or polymer clay, with miniscule faces illuminated by positioning over battery tea lights for evening magic.
Create a fairy costume party scene with accessories like diminutive masks made from paper or tiny fabric capes added to fairy figures, suggesting celebration preparations.
Construct a miniature apple-bobbing station using a thimble or bottle cap filled with water and tiny red “apples” floating on the surface. Position fairy figures nearby, suggesting traditional fall games in progress.
Add ghostly elements like small pieces of white fabric draped over twig frames, or tiny polymer clay ghosts positioned among trees, suggesting fun rather than frightening additions to fairy Halloween festivities.
Winter: Cozy Retreats and Holiday Magic
Winter transforms fairy camping into a magical wonderland of holiday celebrations and cozy adaptations to the colder weather.
1. Winter Camping Adaptations
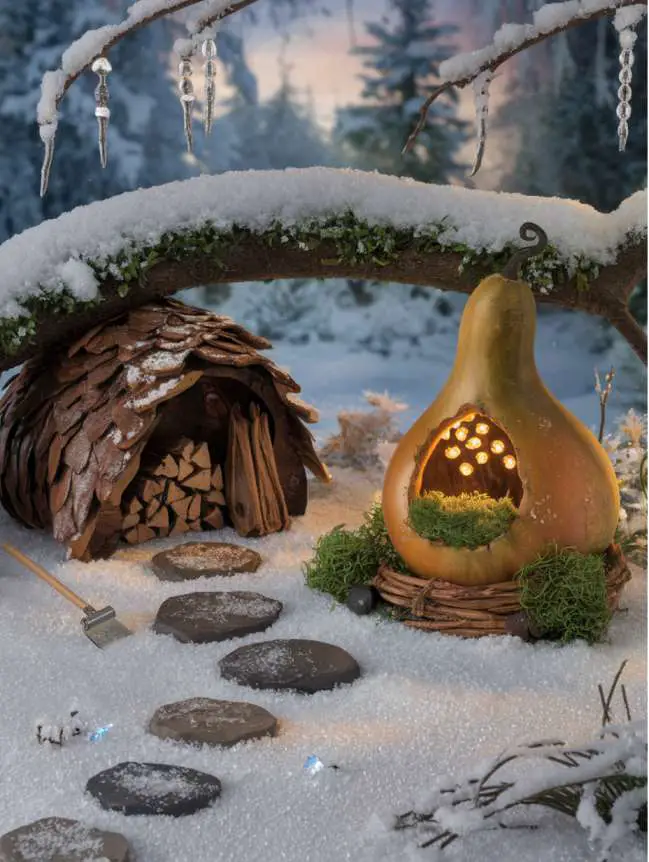
Winter doesn’t mean fairy camping ends—it just changes form. Create more substantial fairy shelters for winter camping by upgrading tents to sturdier structures. Hollow out small gourds with doorways and windows, sealed with clear varnish and insulated with moss “walls” for cozy winter shelters.
Add miniature woodpiles stacked neatly near fairy dwellings, crafted from twigs cut to uniform short lengths and bound together with thread or thin wire. Position tiny axes (made from wooden matchsticks and thin metal) nearby, suggesting winter preparation activities.
Fashion minuscule snow shovels from thin pieces of aluminum or plastic cut into small rectangles and attached to twig handles. Place these near pathways or tent entrances, ready for fairy snow-clearing duties.
2. Holiday Celebration Features
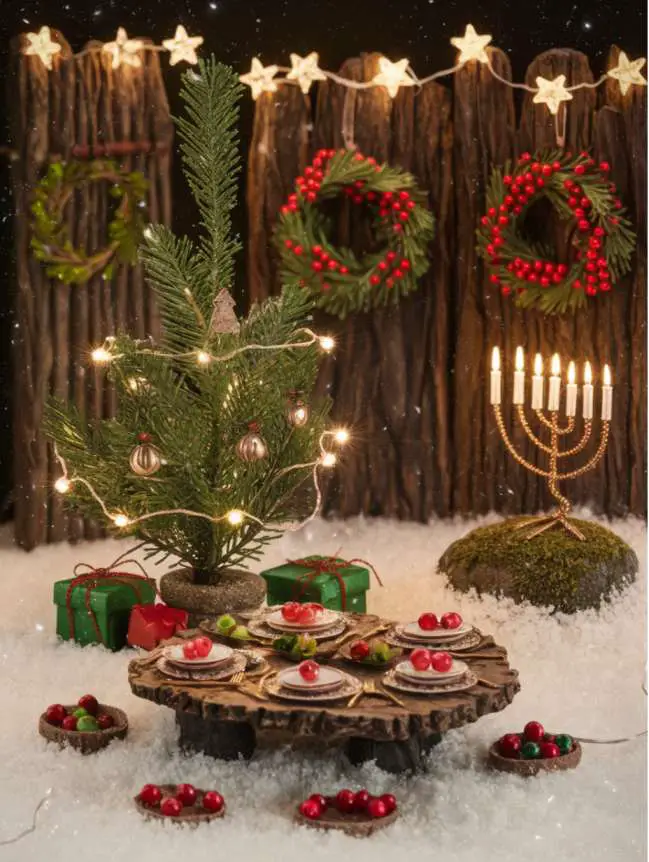
Winter holidays bring special magic to fairy camping gardens. Create tiny Christmas trees using small evergreen branches or baby’s breath spray-painted green, decorated with the tiniest beads as ornaments and fine metallic thread as garland. Position these as central elements in winter fairy gatherings.
Craft diminutive wrapped presents from small cubes of wood or polymer clay wrapped in colorful paper with thread ribbons. Arrange these beneath fairy Christmas trees or being transported on tiny sleds between dwellings.
Add fairy-sized wreaths on doors and miniature garlands draped among branches, fashioned from preserved moss, tiny pinecone scales, or artificial evergreen snippets decorated with red berry beads.
For fairy Hanukkah celebrations, create a miniature menorah using wire formed into the traditional shape with tiny beads as candle holders. Position this in a central fairy gathering spot, perhaps with tiny wrapped gifts nearby.
Fashion a miniature New Year’s celebration scene with tiny party hats created from rolled paper cones decorated with glitter or metallic paint. Add a diminutive “ball drop” using a metallic bead suspended from a branch above a fairy gathering space.
3. Snow and Ice Features
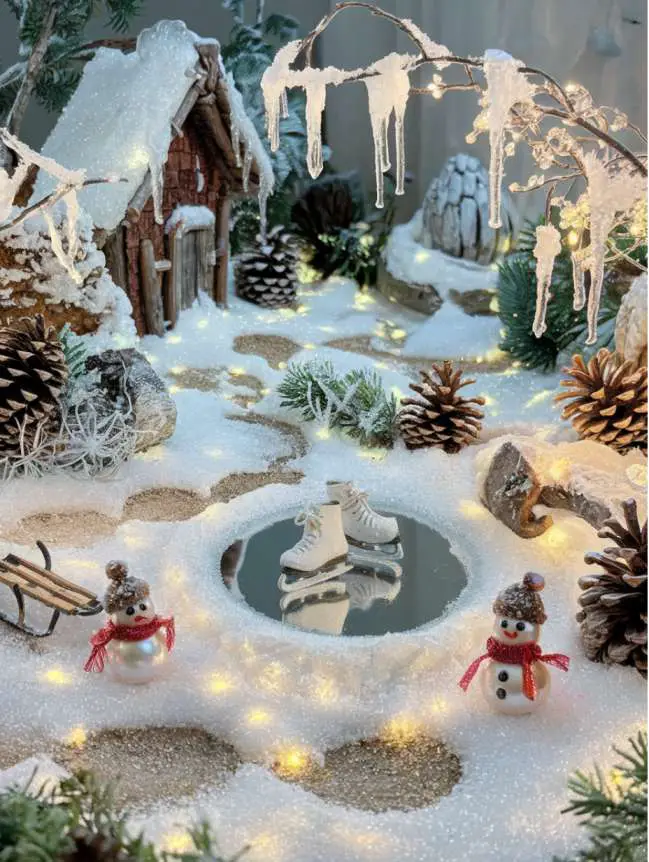
Winter weather creates unique opportunities for fairy garden features. Create “snow-covered” areas using white sand, baking soda, or commercial artificial snow product lightly dusted over plants and structures. For longer-lasting snow effects, mix white paint with baking soda and a touch of glitter for a textured snow that won’t dissolve during watering.
Add icicle effects hanging from fairy dwelling eaves or tree branches using clear dimensional crystal paint applied in small drips and allowed to dry in elongated shapes, or clear glass seed beads threaded on transparent fishing line.
Construct tiny ice skating ponds using small mirrors or clear plastic circles positioned flat on the ground, perhaps surrounded by “snowy” banks and with miniature skates (crafted from tiny wire loops with thread ties) placed nearby.
Fashion winter sports equipment like diminutive sleds made from curved bark pieces or popsicle sticks with wire runners, tiny snowshoes created from bent wire wrapped with fine thread in lattice patterns, or miniature skis crafted from thin wood slivers with bent wire “bindings.”
Transitional Elements Between Seasons
The most engaging fairy gardens include elements that help tell the story of seasonal transitions, showing fairy preparations for upcoming weather changes.
1. Spring to Summer Transitions
As spring moves toward summer, incorporate “growing” garden plots showing progressively larger plants made from green pipe cleaners or wire stems with increasingly full foliage, suggesting the passage of time.
Add butterfly and bee elements made from tiny paper wings attached to seed bodies or small pompoms, increasing their numbers as the season progresses toward summer pollination time.
Gradually shift fairy activities from garden preparation to water play and outdoor adventures, suggesting warming temperatures and changing seasonal priorities.
2. Summer to Fall Transitions
As summer yields to autumn, introduce gradual color changes in your plant materials, incorporating plants with naturally reddening foliage or adding tiny hand-colored leaves to suggest the beginning of fall colors.
Transition summer fruit harvests to fall vegetables and pumpkins, showing fairy garden progression through growing seasons.
Add increasingly warm clothing to fairy figures or dwellings—perhaps tiny scarves made from thread appearing first, followed by more substantial outerwear as the season deepens.
3. Fall to Winter Transitions
Bridge the fall-to-winter transition with fairy preparations for cold weather. Show fairies gathering natural materials like extra moss, pine needles, or bark pieces near their dwellings, suggesting insulation collection.
Add progressively more substantial weatherproofing to fairy structures—perhaps tiny “plastic” windows made from clear packaging material appearing over openings, or additional layers of moss insulation being applied to dwelling exteriors.
Incorporate miniature storage containers filled with “preserved” foods like tiny acorns, seeds, or polymer clay mushrooms, suggesting winter preparation and food storage activities.
4. Winter to Spring Transitions
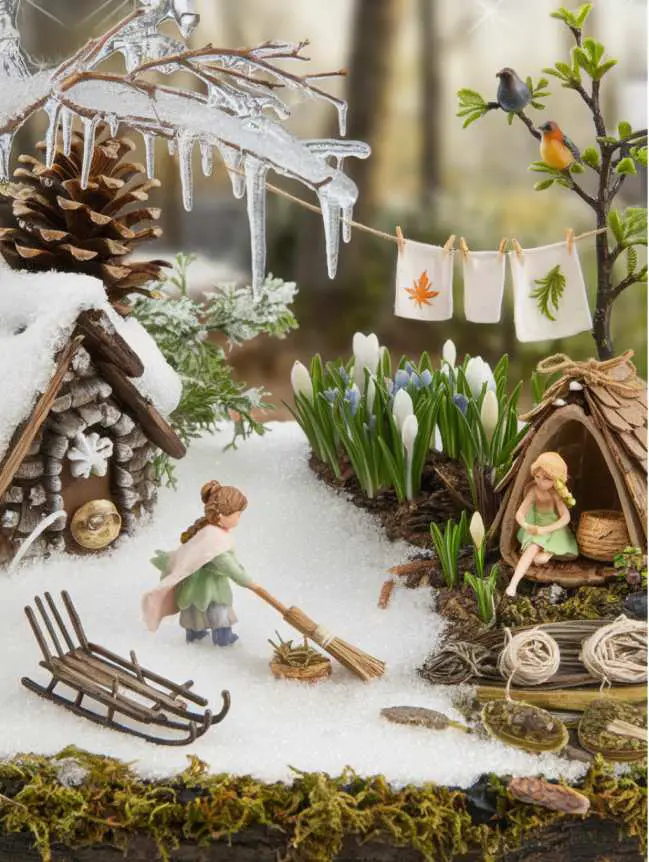
As winter moves toward spring, introduce early signs of growth with tiny green shoots (fine wire painted green) emerging from “snow-covered” ground, or miniature crocus or snowdrop flowers crafted from polymer clay appearing in patches.
Show fairy spring cleaning activities with miniature brooms made from bound herb stems sweeping away winter debris, or tiny washing lines strung between trees with diminutive fairy linens hung out to air in the strengthening spring sunshine.
Add nesting materials being gathered by fairies—small bits of string, moss, or soft plant fibers placed in neat piles—suggesting preparation for returning birds and spring renewal.
By incorporating these seasonal themes and transitions, your fairy camping garden becomes a dynamic, ever-changing story told through miniature landscapes and activities. Each season brings new opportunities for creativity and storytelling, keeping your fairy garden fresh and engaging throughout the year. The changing elements invite repeated viewing and appreciation, making your fairy garden a living calendar that celebrates nature’s cycles in whimsical miniature form.
Maintaining Your Fairy Camping Garden
Like any garden, your fairy campground needs regular care:
- Choose plants with similar water and light requirements for easier maintenance
- Use tweezers for precise weeding around tiny accessories
- Periodically refresh the scene with new elements to maintain interest
- Protect from extreme weather by relocating portable gardens or adding seasonal protection
Fairy Camping Adventures for Children
Fairy gardens offer wonderful opportunities for children to connect with nature:
- Let them create stories about the fairy campers
- Encourage them to write fairy camping “field guides”
- Have them leave tiny notes for the fairies (and perhaps find fairy responses!)
- Challenge them to create accessories from natural materials found outdoors
A fairy camping garden becomes a living storybook that children can help write through their imagination and creativity.
Photography Tips for Capturing Fairy Magic
Once your fairy camping garden is complete, capture its magic:
- Photograph at dawn or dusk when light is soft and magical
- Try ground-level shots to create the illusion of being in the fairy world
- Experiment with macro lenses to capture intricate details
- Consider adding a fine mist of water for dewy, magical effects
Final Thoughts
Fairy garden camping brings together the timeless appeal of miniature worlds with the adventure of outdoor exploration. Whether you’re creating a simple scene in a flowerpot or an elaborate multi-level landscape, these miniature campgrounds offer a delightful escape from everyday life and a chance to connect with nature in a uniquely creative way.
The best fairy gardens evolve over time as you discover new plants and accessories to add. Like real campsites, they can be places of peace and contemplation or buzzing centers of activity—the story is yours to tell through this enchanting miniature world.